How to Sew Lingerie Elastic

how to sew lingerie elastic | a tutorial from Watson Sew Along at Cloth Habit

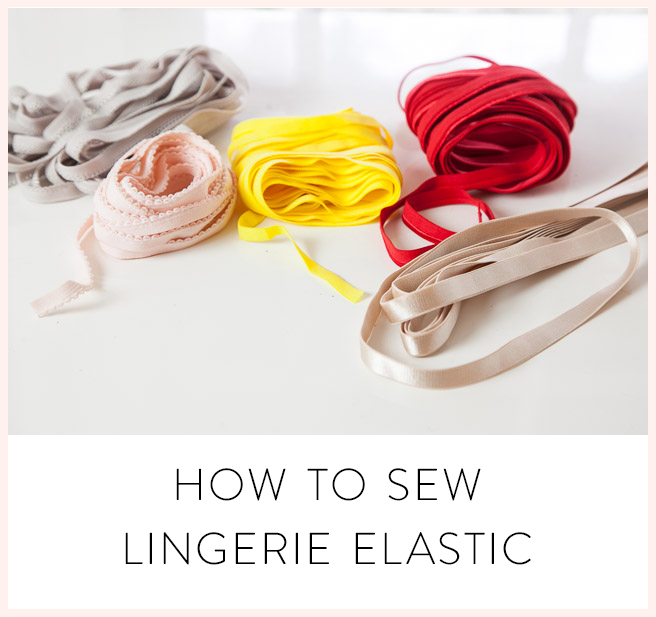
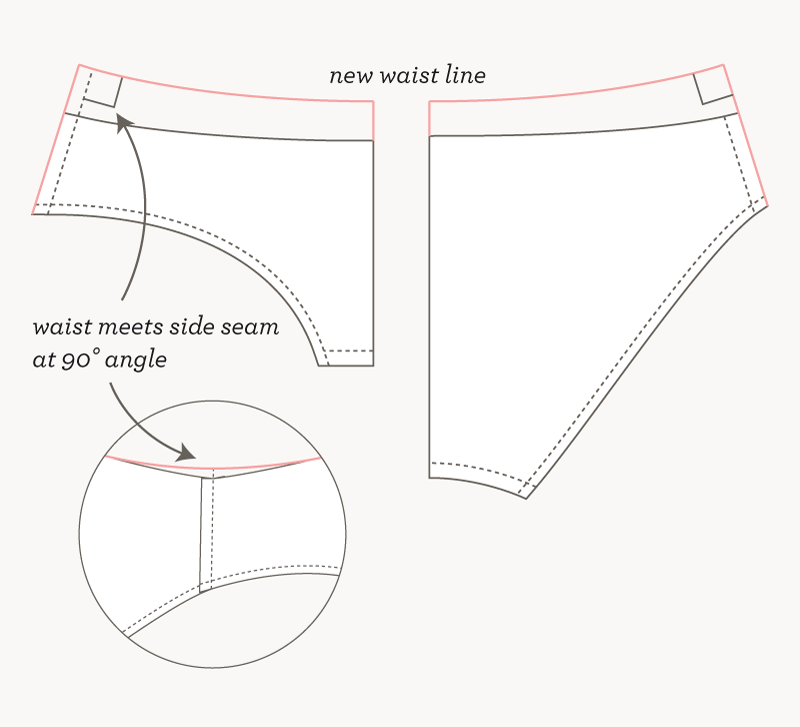
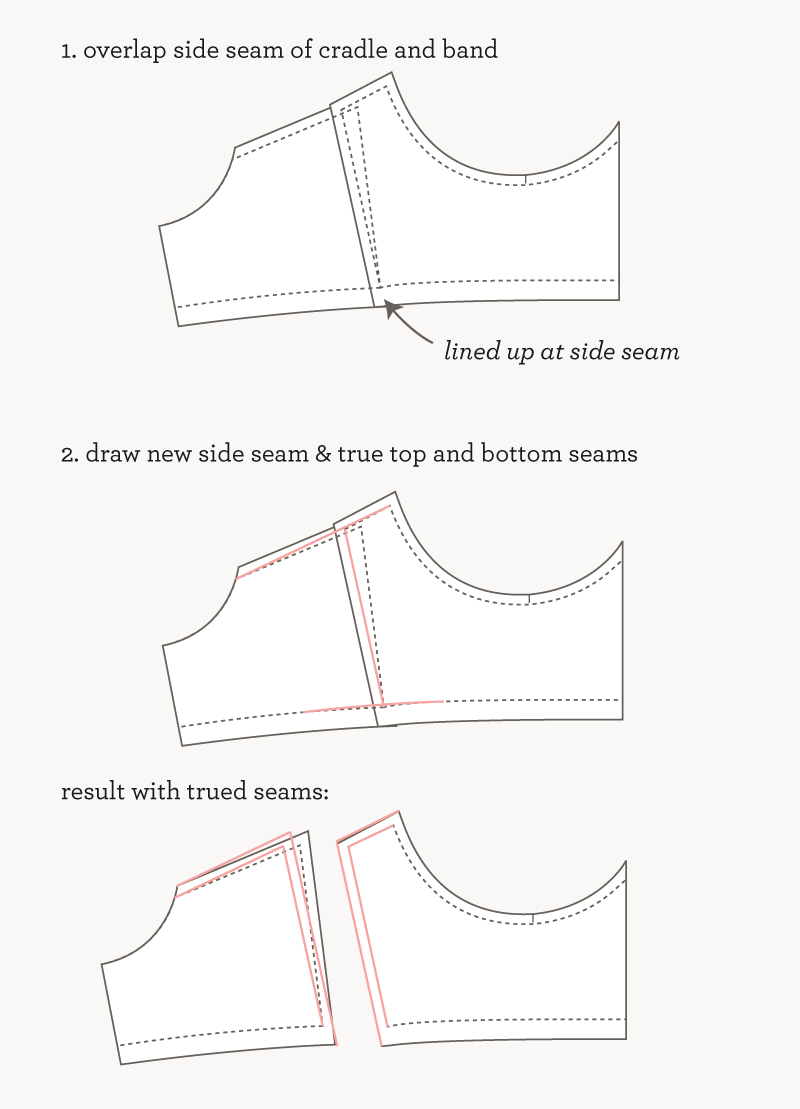
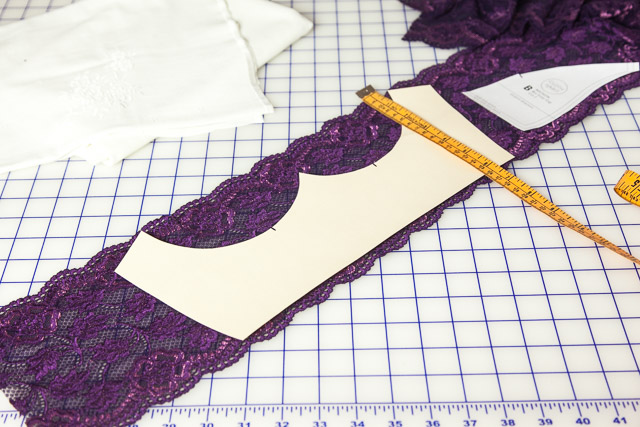
We’re almost ready to cut! Before we get to cutting or sewing, I thought it would be useful to review the basics in sewing lingerie elastic. It’s very simple but you’ll be doing it over and over again.

If you are brand new to sewing elastic, you don’t need any special equipment, just your regular zig-zag foot. To make things easier to understand for beginners, I included a short video at the end.

Basic Elastic Technique

basic technique for sewing lingerie elastic | Watson Sew Along

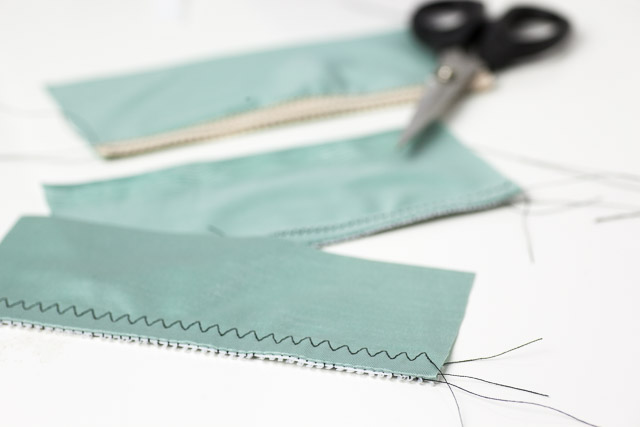
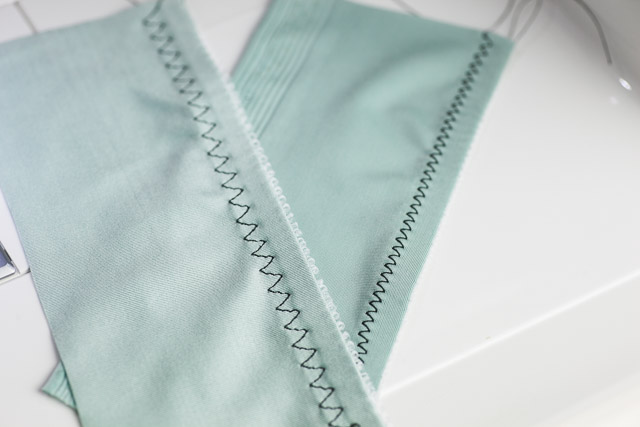
Except for the straps on the bra, all of the elastic is applied using the same “stitch, fold and stitch” method that is commonly used for lingerie elastic.

1. Align the non-decorative edge with the edge of the fabric. You want the wrong or plush side to be facing up.

Sewing Lingerie Elastic | Watson Sew Along

If your elastic does not have a plush backing, it might be harder to distinguish the wrong from right sides, in which case you can use whichever side you like better.

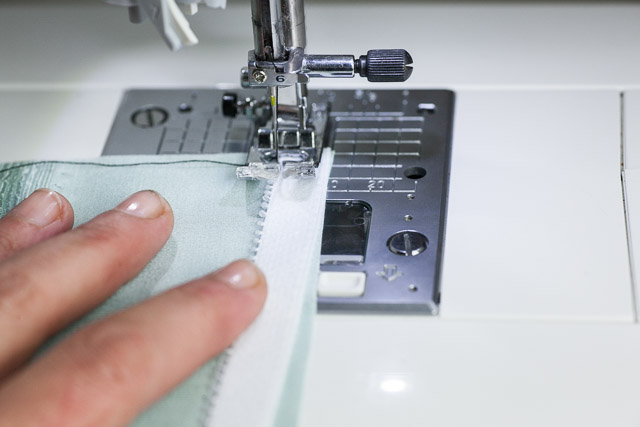
2. Stitch the elastic to the fabric, using a smaller zig-zag. As you are stitching pull the elastic gently (see tips at bottom for what I mean by gently).

Sewing Lingerie Elastic | Watson Sew Along

Try to get your zig-zags as close as possible to the decorative edge. It will almost look like your needle is going over the edge of the elastic.

Sewing Lingerie Elastic | Watson Sew Along

Don’t worry if you veer off a bit. It takes practice and you won’t notice these minor things in the end.

2. Once you are done, you can trim down the fabric close to the stitches. I don’t always trim. It depends on the weight of the fabric, how much bulk it might add, and whether or not it is peeking out from the elastic.

Sewing Lingerie Elastic | Watson Sew Along

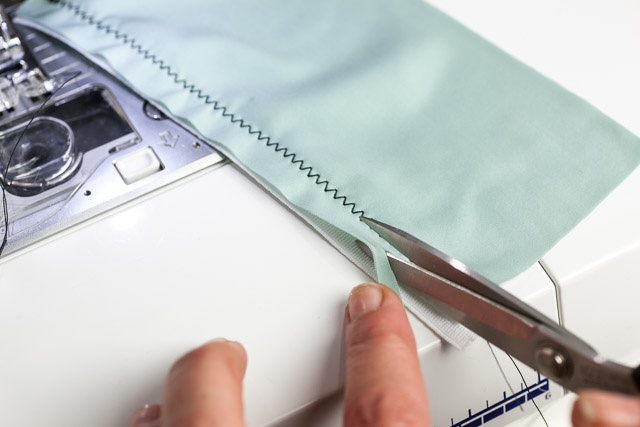
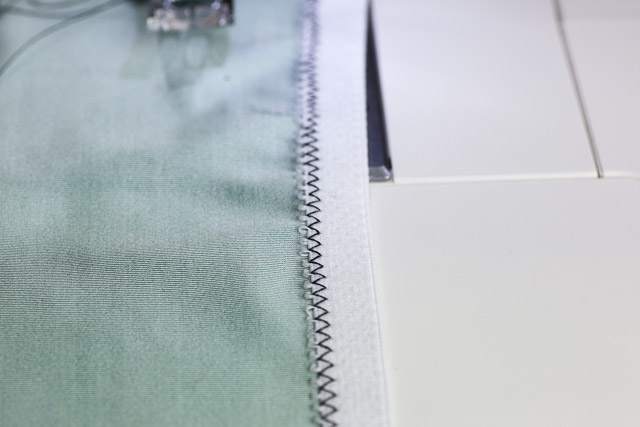
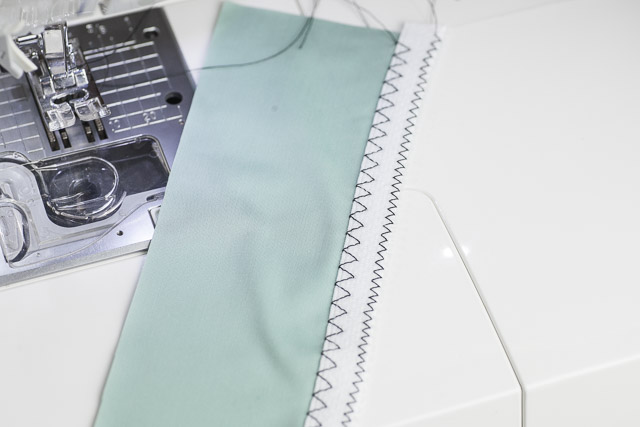
3. Turn your work around and fold the elastic over that the wrong side is facing up again, and stitch again getting as close to the edge as you can. On this second pass you usually want a slightly wider zig-zag, or a 3-step zig-zag for certain elastics.

Sewing Lingerie Elastic | Watson Sew Along

Stitch Lengths

The Watson instructions include suggested stitch lengths and widths for every step and I’ll be reiterating those when we sew.

As you gain more experience, you’ll learn that every elastic is different and sometimes you need to adapt your stitches to the elastic. Take a look at some of your favorite RTW undergarments and see what stitches are used and where and on what kind of elastic. Try to replicate these on scraps of fabric and see if you like them.

The Triple Zig-zag

This stitch is sometimes called a 3-step zig-zag. It does exactly that–takes 3 straight stitches up and 3 straight stitches down. You can see the difference between the 3-step and a regular zig-zag on the left:

Sewing Lingerie Elastic | Watson Sew Along

Most modern machines come with with a 3-step zig-zag, but if yours doesn’t don’t worry. I’ve made many bras and underwear without it, and never had a popped stitch on them. The best place to use this stitch is on a firm, plush elastic. It is often used and the top and bottom of bra bands, and very occasionally on underwear.

You don’t need to use it everywhere, and one reason has to do with preventing elastic fatigue. In manufacturing they do a lot of testing for the best elastic tension and stitch type for each elastic and how it interacts with the weight of the fabric. The more stitches and thread you put into an elastic, the more you impact its ability to rebound. A firmer plush elastic can handle the heavy stitching, but lightweight and very stretchy elastics will lose a lot of their rebound with a 3-step. This is the most frequent cause of wavy edges—when an elastic has stretched further than the actual length of the opening and is not able to rebound back to the original or smaller size.

In general, I recommend only using the triple zig-zag on elastics that are 3/8″ or wider, have a plush backing and are fairly firm.

How Much To Pull?

I like to sew in elastic by feel. In bra-making, this is a very good skill to develop.

If you have never tried this before, try this: cut a piece of your lingerie elastic exactly 5 3/4″ or 14.6cm. Stretch it out to 6″ or 15.2cm. This is what 5% reduction feels like, and is a good idea of how much to stretch on most elastics as you are sewing.

I don’t calculate this any of this ahead of time; it’s more intuitive and I promise you don’t have to think about it that much and soon enough you’ll get a feel for how much tension you like.

Most elastics work best with anywhere from 3-8% reduction. In other words, the length of the elastic is 3-8% less than the actual seam line it is covering. I’d say that 8% is on the extreme end. The harder you stretch on an elastic as you are stitching, the more thread you put into a smaller space in the elastic and reduce its ability to rebound and continue flexing with wear. For the hem on a bra band, I put very little tension on the elastic. (It probably works out to about 3% but I haven’t measured that.) For underwear and the lighter bra elastics I pull a little bit more.

Watson Sew Along #3: Bikini Alterations

Bikini Alterations| Watson Sew Along

Today we’re going to give the bikini some love. I know that the bra is the star of this pattern but it’s always fun to make a matching set. I never feel complete if I don’t make bottoms to go with my tops!

I like a few different styles of underwear. My go-to is my Ladyshorts pattern but I love bikinis, too. I made about 20 of these to get the fit just so. (I’m obsessed with underwear patterns, what can I say.) However, we all have our preferences. Some of us like a a lot of leg, a lower leg, a higher waist, a very low slung waist. So I am giving you permission to experiment with your pattern, just like I experiment with all of mine. The alterations I’ll be demonstrating are essentially style changes.

Adjusting the Rise

If you are tall or prefer a slightly higher waist, you can simply raise the waistline.

Trace off or print out a new pattern. Before you cut, use a ruler to draw new lines up from your side seams and waist. It’s really as simple as that!

Adjust Bikini Rise| Watson Sew Along

Don’t forget to true your pattern after any alteration. By checking that the waist meets the side seam at a 90° angle help the side seams meet at a smooth curve and not a jagged “V”.

Add More Leg Coverage

This bikini is not “full butt coverage”. There are all sorts of bikini styles! This one shows a bit of cheek. How much or how little will also depend on where the widest part of your hips are located. If you want more coverage, here’s the way to do that:

1. Lower the side seam. I’d suggest no more than 1″ (2.5cm). 2. Draw a new smooth curve as illustrated:

Adjust Bikini Coverage | Watson Sew Along

You want to make a subtle curve on the back piece. Don’t extend the “cheek” area more than you extended the side seam; otherwise you may create too much length in the back leg line.

For example, if you don’t draw the side seam down but only enlarge the back, you end up with more fabric across the back but a longer leg seam:

adjusting bikini coverage (with caution)  | Watson Sew Along

Because that new line is longer, it can have the opposite effect of what you wanted, and the leg might rise up even higher. There’s an art to the leg line! Just something to think about.

Raise the Leg

This would be a good alteration if the front of the bikini is cutting into your thigh or you just want a slightly higher leg cut:

Raising Leg Line on Bikini | Watson Sew Along

Moving Front or Back Seam

The location of the crotch seams can be anywhere you want them. If you don’t like where they are sitting, you can move either of them! This is an example of how you’d move the front seam:

Moving Bikini Crotch Seam | Watson Sew Along

You can also completely eliminate one of the seams and cut the front or back as one with the crotch lining. I do this all the time when I want to make a really quick pair, and I’ll show you how when we cut the bikini. I’ll also be showing you how to sew the crotch lining in a way that hides all seams.

And that’s it for today!

Watson Sew Along #2: Bra Fitting Alterations

Watson Sew Along Day 2 | Fitting the Bra

I love being a student in the finer points of bra-fitting, but once in awhile I need a respite from the underwires and the structure. One of the things I love most about this pattern is that it is very easy to fit with a few simple adjustments.

Over the next two posts, I’ll walk through a few common pattern alterations. These might help some of you who have already made the Watson or want to make a quick test bra during the sew along. Today I’ll focus on the bra but I’ll be back after the weekend with a few bikini suggestions, too!

Marking Your Pattern

Because bras use such precise seam allowances it is a good practice to mark in your seamlines. I often stress this, since fudging 1/8″ here or there can add up in a bra.

Marking Seam Allowances | Watson Sew Along

When you make adjustments, you’ll be making them from the seamline. Afterwards, fix or true the seam allowances for these new seams. On this bra, all seams are 1/4″ (6mm) EXCEPT the band hem, which is 1/2″ (13mm) and the strap fold line, which is 5/8″ (16mm).

Marking the seamlines can also help you remember the elastic allowances or change them. For example, if you want to use a 3/8″ (10mm) plush elastic at the top of the band, you add an additional 1/8″ (3mm) to the seam allowance on this pattern. If you wanted to use fold over elastic at the neckline, you’d remove the 1/4″ allowance.

Measuring for Straps

To find your best strap length, measure from your shoulder to your bustline and multiply this measurement by two. The result is one strap length, and you need two of these. It may need to be shorter, depending on how high the cups are on your chest, but you can refine this length later on.

Fitting the Band

This pattern is drafted for a fairly firm powernet with about 35% stretch. If you are using a lighter or stretchier band fabric–such as stretch lace, lycra, jersey or a lightweight stretch mesh, this may result in too big of a band fit.

If your band is too big you can try one of the following:

  1. Go down a band size or even two sizes.
  2. Double your fabric (but test the stretch of your fabrics when doubled).
  3. Try a stronger band fabric.
  4. Adjust your band pattern piece.

Adjusting Band Length

You can determine how much you want to shorten the band by pinching out the excess and measuring the amount you pinched. Or you can adjust your band with a little math! Remember that you only need to adjust your band piece by half of the amount you pinned out, since there will be two of them.

Adjust Bra Band | Watson Sew Along

Adjusting Angle of the Band

If you are experiencing gaping along the underarm, you may need to adjust your band so that it is shorter along the top.

adjusting for underarm gape | Watson Sew Along

If the bottom of your band feels too tight but everything else seems to fit, the band may be too angled for your body shape. You may notice this particularly in the longline bra. You can adjust the band so that it is longer at the hem:

relieve tightness at bra hem | Watson Sew Along

Adjusting the Strap Position

In the front of this bra, the straps should be quite centered above the breast, going to the middle of the shoulder.

If you find that your straps are sliding away from the middle of your shoulder (or sliding off your shoulder), try narrowing the strap distance in the back.

Adjust Bra Strap Placement | Watson Sew Along

Adjusting Cup Volume

If your cups are too big, you’ll notice wrinkling in the cups.

Many times these will look like vertical wrinkles in the top half of the cup as the breast settles in the bottom of the cup. If this is happening to you, your cup has too much overall volume for the fabric you are using and I’d recommend going down a cup size.

If the ripples are minor and you are happy with the overall fit of the cup, you can simply take in the cup seam, much like you’d take in a princess seam. You want to take in each seam equally on both sides in order to keep the seam lines the same length. This adjustment will flatten the curves a bit:

Adjust Cup Volume| Watson Sew Along

Tip: There’s no need to get fancy with your curves; stretch knit patterns need very simple lines.

Lowering Cup Height

If your cup is too high on your chest AND you have wrinkling in the top of the cup, first try going down a cup size. However, if you are fully filling out your cup and the cups are still too high for either taste or proportion on your torso, you can try lowering the height of the cup. First mark in the strap fold seamline, which is 5/8” from the top of the cup and cut away this part:

Adjust Cup Height| Watson Sew Along

Try moving the strap attachment seam about 1/4″ but no more than 1/2″. There is a limit to how much you can lower the cup before the strap attachment point starts landing right on top of your breast. This bra has triangle-style cups that are meant to go all the way over the top of the breast.

——-

These are the most common adjustments I use in bra-making but if you have a particular fitting question not addressed, don’t be shy about asking!

Watson Sew Along #1: Gather Fabric & Supplies

Watson Sew Along: Fabrics & Supplies

Hello everyone and welcome to the Watson Sew Along!

I’m excited to get started, and today we’re going to jump in with a little preparation and gather up our supplies.

Find Your Size

First things first… If you haven’t done so yet, you’ll want to measure yourself and find your size using the suggestions in the pattern. If you haven’t measured yourself in a while, it’s worthwhile to re-take your measurements.

Quick measurement tip: when taking the measurement under your bust, exhale all the way and take a very close fitting tape measurement. This is how I now measure others for their bands and I tend to get a better fit this way. For example, when I fully inhale and measure, my underbust is 30″. But when I exhale all the way, I measure about 28”. I use the smaller measurement to determine my band size.

Print & Assemble Your Pattern

Watson Sew Along: Fabrics & Supplies

For the bra pattern, you’ll only need 4 or 5 pages. Don’t forget to check the Bra Printing Guide so you know which pages to print off for your size. Most of the bra pattern pieces fit entirely on one page but in some of the larger sizes, you’ll need to tape two pieces together using the page notches as a guide.

Gather Fabric and Notions

Watson Sew Along: Fabrics & Supplies

I’m going to be making a cream-colored set with black trim. Very ooh la la, and hopefully easy to photograph!

Before every lingerie project I print out a checklist and collect everything together in a little baggie as I go. It makes gathering all the bits and bobs so much easier.

You’ll need:

  • cup and cradle fabric*
  • cradle lining or interfacing
  • band fabric (if different from your cup fabric)
  • strap elastic
  • 1/2” plush back elastic
  • 1/4” plush back elastic
  • 1/2” rings and sliders
  • hook & eye (I recommend a 3-row for the longline version)
  • main bikini fabric
  • 1/4″ lingerie elastic

Note on elastic widths: The pattern can be easily adjusted for wider elastics if you prefer them. If you wish to use a wider strap elastic, make sure to buy your rings and sliders in the same width as your strap.

*For the scalloped lace variation of the bra, you’ll need:

  • at least 1 yard/meter of stretch lace
  • 1/2 yard or meter of narrow clear elastic to stabilize the edge of the lace scallops

When buying stretch lace, make sure the trim is at least 6 1/2″ wide. The cups will be laid out a bit like this:

Watson Sew Along - Fabrics & Supplies

And if you want to use lace in the longline version, you’ll need to measure across the widest part of the cradle so that you get a wide enough lace:

Watson Sew Along - Fabrics & Supplies

Tools & Supplies

Watson Sew Along - Fabrics & Supplies

Some of these tools are completely optional but they are extremely helpful in lingerie making. Be sure you have a few good marking tools, machine needles, and thread!

  1. Tailor’s chalk or chalk wheel – for tracing around patterns onto fabric
  2. Ball point pen – for tracing onto fabrics that don’t tend to accept chalk wheel marks. You can also use a fabric-marking pen.
  3. Pencil – for marking in seam lines
  4. C-Thru ruler – this is my preferred tool for marking in seam lines. I use several of these rulers for patternmaking; the B-50 is my favorite for bras.
  5. Pattern weights – for weighing patterns to fabric. (I don’t know where to buy the weights in the photo as I have had them for years, but I also use cheap washers from the hardware store.)
  6. Silk pins – These are inexpensive glass head pins, and they are wonderful for lingerie sewing. Fine pins won’t snag as easily on lycras, laces and delicate lingerie fabrics.
  7. Size 11/75 stretch needles – I buy these by the box because I use them so much in lingerie making. If you can’t find a stretch needle look for a size 11 ballpoint needle.
  8. Polyester thread*
  9. Sewing shears or rotary cutter (if you are a fan of rotary cutting)
  10. Embroidery or tailor point scissors – these are great for trimming seams and clipping threads.
  11. Serger thread* – only if you plan on serging either the bikini seams or the bra cup seams.
  12. Card stock – I like to print out bra patterns to card stock, which makes the patterns much easier to trace onto fabric. You can also trace the paper patterns to oak tag (manila folder paper), heavier weight drawing paper—anything that holds an edge.
  13. Straight stitch foot (you can see mine here) – For neat lines of topstitching and edgestitching. Your machine may call this a “patchwork foot” or “1/4 foot”.

*For extra soft seams, you may want to try a finer polyester thread or wooly nylon in your serger. See my post about these threads.

Prewash Fabrics

You may also want to prewash your fabrics the way you intend to wash them afterward. Many nylon-based fabrics don’t shrink at all but I’ve had a few surprises! (My first Bombshell swimsuit shrunk almost two sizes and I learned my lesson on pre-washing lycras!) For most lingerie fabrics, I handwash in cold water and hang to dry. Spandex does wear out with heat and I like my lingerie fabrics to last as long as possible.

That’s it for today! Any questions? Feel free to ask in the comments!

Watson Sew Along Schedule

Watson Sew Along | Cloth Habit

Happy New Year everyone! I’m a day (or six) late, but I hope your holidays were happy and full of love. Here’s to a wonderful year in sewing!

I’ve been recuperating from travels, planning new projects for the year and of course I’m getting ready for the Watson Sew Along. That’s right, we’re going to get down to making some Watsons.

Making this set is surprisingly fast but this will be a leisurely sew along that’ll give you room to catch up, or sew slowly, or sew other things in the midst. We don’t get started on cutting until January 23 so you have some time to find your materials.

The Schedule (Updated!)

Please see the Watson Sew Along page for a complete list of all published tutorials!

If you have already made one or two (or some of you many more!), I promise there will be a few new tips along the way to add to your lingerie-making arsenal.

Sew Along Badge

Watson Sew Along | Cloth Habit

(If you’d like to include the badge on your blog, right-click and download the image, then upload to your blog. It’d be super if you linked the image to the Watson Sew Along page!)