Bra Tips: Fitting An Underwire

Finding Your Wire Size | Cloth Habit

It’s reader question day! Recently, a reader asked by email: How do you know what size to start with? The wires in my bras dig into the breast tissue under my arm and it’s so uncomfortable!

I can definitely relate to that! I’ve written about wires & fitting a few times, but today I’ll share a bit more for the first-time bra-makers or for those who’ve been having a hard time figuring out where to start!

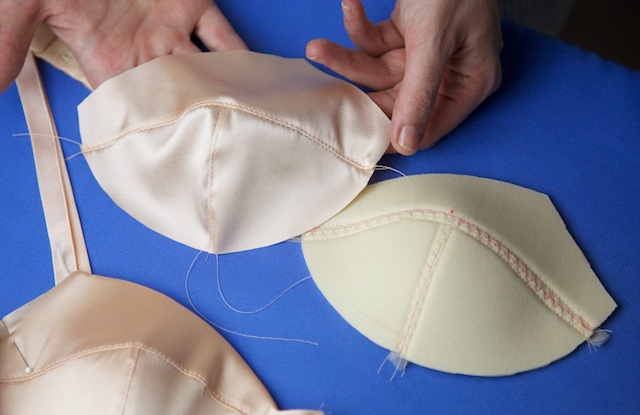
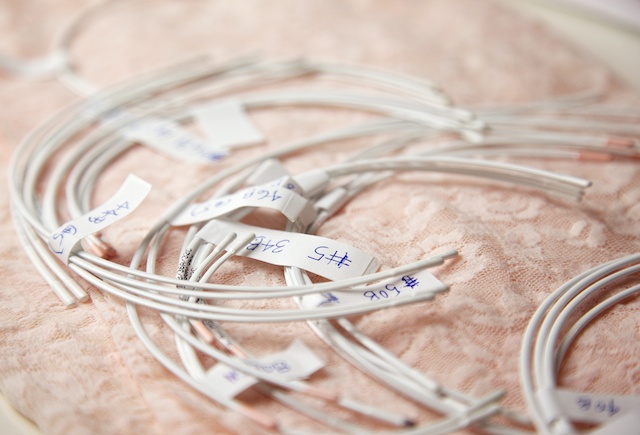
When I bought my first bra-making kit, I was very confused about wire sizes. Weren’t they all the same? It wasn’t until I started pulling out wires from old bras and fitting others that I realized how different they can be. Wires come in many shapes, sizing gaps and strengths. For example, these are both full length wires for a 32F bra:

Finding Your Wire Size | Cloth Habit

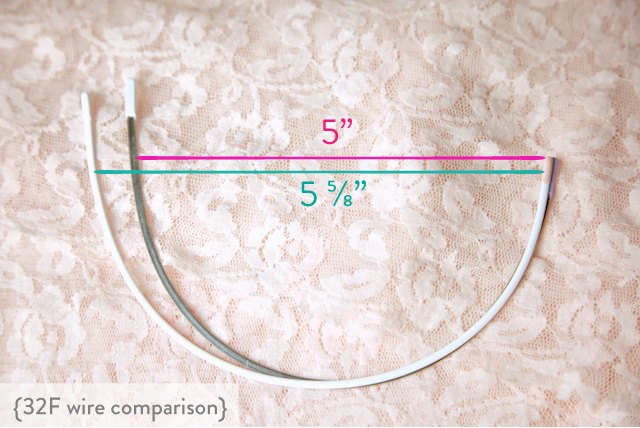
I pulled the narrower one from a Panache bra, and the white one is from my collection. The reason I share this is so you can see that wire sizes aren’t a static thing. So the very best way to start is buying a few wires and trying them on–without worrying about what size you are. Try a set of wires in the size you think you are (or are currently wearing), and then a size up or down. Or if your wires typically feel tight, you could try the next two sizes up.

When trying on the wire, place it up against your breast root, the area where your breast tissue joins your chest wall. It should rest comfortably against the edges of your breast like it is sitting in a pocket. If you’re having trouble seeing your breast root, lift your breast tissue up higher or even raise your arms to see this line.

Finding Your Wire Size | Cloth Habit

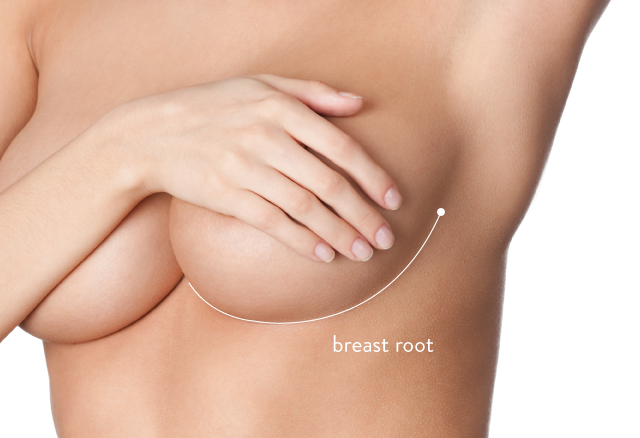
Finding the root on the side of your breast can sometimes be a little harder. Some of us have breast tissue under the arms. And sometimes it is hard to see where extra fatty tissue from our arms or side is distinct from breast tissue. (There are a lot of opinions about whether or not underarm flesh is “migrated” breast tissue, but this is something I’d rather hear from my OBGYN. Please ask yours if you have questions about it.) In this case, try to find the wire that sits most comfortably against the side of your breast and doesn’t look like it is riding up onto your actual breast.

Hopefully this will give you a good place to start. Unless you have the special opportunity of taking a bra-fitting workshop in person, you will have to buy and try a few until you find one you like, which I believe is worth the small investment!

special cases

Sometimes there are special cases in wire fitting. Perhaps you have made a bra or two and still feel like something is wrong in your wire fit. So let’s discuss a few of those!

1. Pokey Wires

Perhaps the wire that seems to fit may seem a little too long or too pokey for your comfort. This might be the case if your breasts are higher up on your chest, closer to your underarms. Instead of trying to hunt down a shorter wire, consider buying some wire cutters! They’re an inexpensive investment and my bra-making friend–I wrote about cutting and tipping wires in this post.

2. Big Cup, Small Band

Traditionally, wire sizes increase by anywhere from 6 to 10mm in diameter per size. And as the sizes go up, these varying “grading” increases can add up to big differences for larger cups. If you have the cup volume of a 36D but have a small ribcage, the traditional wire for that size might have too wide of a diameter and could possibly wrap too far into your side.

In this case, you may want to look for a wire that is long enough to encase your breast but narrower in diameter. The Panache wire in my earlier photo is a narrower wire. Both Bra-makers Supply and Sewing Chest UK sell narrow but long wires.

3. Small Cup Needs

The opposite is true for some women who have small cups but an average band. You may have the breast volume of a 34A but need the wire with the width of a 34B. This is my personal issue. I wear a 30D bra with a wire one size larger–and cut the side length down so it doesn’t cut into my underarm.

(Please take note: I’m not an expert on special medical conditions. These are just the common issues that I have encountered.)

I hope this helps you in the search for wires! Just remember, how a wire fits and feels is a very personal thing. And even a small change in weight, post-breast feeding, etc., can change your wire size and comfort. Only you will really know how it feels, and whether you actually want to wear one! So don’t be afraid to experiment.

Bodysuits & Marilyn Moments

Nettie bodysuit | Cloth Habit

I’m really enjoying the start of summer, which normally brings on a small amount of worry. How will I make it through the furnace without losing my mind? Instead, I’m thinking about all the things I crave in summer that I don’t other times of the year. Like cucumber sandwiches. Smoothies. Inventive cocktails with big ice cubes. According to my crafty drink-making friends big square ice cubes are the rage right now. They take forever to melt and a pleasurable texture on a hot day.

Nettie bodysuit | Cloth Habit

So I have a confession to make–this is the second day in a row that I’ve worn this outfit. And it wouldn’t be the first time I’ve done something like this in hopes of getting a good blog picture. My blogging vanity has gotten the better of me! I’m not the best photoshoot planner in the world, and don’t often plan my posts ahead of time so if I miss an opportunity, I’ll wear it again, darnit! On the first day, by the time the sun started to go down I set everything up and my timer went missing. It’s too hard to take selfies without a timer.

On the second day, I had a friend to help but the wind was outrageous. This turned out to be rather fun because it makes the skirt a whole personality of its own. You may recognize this as the Megan Nielson Cascade skirt, which I made last summer and wish I had about 10 more because it’s just so light and easy. Second confession: I had more than one Marilyn Monroe moment while wearing this in the wind. Like, full on Marilyn with the skirt flipping up to my waist, one time in the grocery parking lot. Thank goodness there was a bodysuit underneath!

Nettie bodysuit | Cloth Habit

Nettie bodysuit | Cloth Habit

This is the fun Nettie bodysuit, a pattern by my gal Heather Lou of Closet Case Files. When she asked me to test the pattern I happily obliged even though I have mile long list of sewing-relating things going on lately! It’s my pleasure to support her patterns–and I don’t need much encouraging to when it comes to anything remotely lingerie-inspired. I’m totally sold on the merits of a bodysuit. I like sleek and all purpose basics that cross the lines of lingerie. I love them because they’re comfortable and easy and secretly letting me be a bit sloppy wtihout looking like it.

Heather was onto my game, and I love that she made options for super skin-showing deep backs. It has only been the last couple of years that I’ve started to wear more back-showing garments. I used to feel very nervy about revealing it due to scars and moles and whatnot but I’ve finally decided that I like the character. (I promise I did not photoshop my back–in good light you’d see it all.)

Nettie bodysuit | Cloth Habit

Anyhoos, there’s not much to tell in the way of details. This is a super easy project, an hour or so if you’re fast with the serger! I used a bamboo-cotton-spandex blend jersey that I’ve had in my stash for a few years. For some reason I bought 5 yards of the stuff but I’m glad I did because I’ve gotten good mileage out of it for several projects. It’s a bit weightier than your typical jersey so makes a great fabric that stretches well over the body without show through.

I substituted lingerie elastic as the leg finish, just because I have loads of this stuff. But next time I’m going to try the same banding finish that is used for the neckline. I have a swimsuit with this kind of banding at the legs (instead of encased rubber elastic) and it’s super comfortable.

Ok, one last outtake, just for fun. This is called my “Neiman Marcus model pose”. I have so much more fun when I’m not doing this by myself!

Nettie bodysuit | Cloth Habit
Have you tried the Nettie yet? I’m excited to make a couple more, maybe with shorter sleeves for the impending heat!

Details:
Bodysuit: Nettie by Closet Case Files (I made size 8)
Fabric: Bamboo/cotton/spandex jersey (I forgot the source!)
Elastic: Sew Sassy
Skirt: Cascade by Megan Nielson, blogged here

Photos: Stephanie Press

Wardrobe: Summer Colors

Summer Color Palette | Cloth Habit

Since my big wardrobe purge a couple weeks ago I’ve been slowly catching up with Colette’s Wardrobe Architect series. I’m actually trying to do most of the exercises, albeit in a backwards order. This planning stuff is fun! I’m getting kind of serious about not adding anything to my closet that I won’t wear.

Since I left my closet a bit empty, the first thing I did was buy a few quality basics in white and black. I’m always reaching for white or black camisoles, t-shirts or tanks. My goal is to have at least one fitted and one loose version of each.

Then I started drafting up a color palette and collecting some summer wardrobe inspirations on Pinterest.

Coming up with an inspirational color palette is one of my favorite seasonal activities, but this time I thought a little bit harder about what constitutes neutrals and statement colors, what colors I’ve been consistently drawn to no matter the season or year, and what’s been catching my fancy this year. Normally I just go with the latter but it never makes for an intentional wardrobe plan!

Here was my original color palette before it got whittled down.

Summer Color Palette | Cloth Habit

Looking at this now, I’m surprised I’m in such a colorful mood, and I never perceived myself as a pastels gal. You might guess from my Signature Style board that I’m normally drawn to eccentric, intellectual, moody and quite masculine style. I consistently come back to black and red and white. Red was actually one of my “neutrals”–I never think about it as a statement color. For some reason in my eyes it goes with everything!

But there is always the gardener and wildflower lover in me. I’m quite fond of blushy pinks and pale corals in particular. When picking out roses for my garden years ago, I got obsessed with what I call the prefect shell pink. It’s couldn’t be too peachy, or too pinky, but almost translucent. My favorite is Souvenir de La Malmaison–its blooms gradually disappear into a pale warm pink after a few days in the sun.

A little bit new to me are minty colors. Jade, celadon and those moodier mints keep attracting me. Or the color of an ice cube as it drops into a mint julep.

Anyhoos, you’ll get to see a lot of these colors in action by mid-summer. Over the last couple of months, I’ve been dyeing up a group of fabrics, mixing my own dye colors for a group of lingerie items. I’m down to the very last dye pot and just love having all these fabrics in my dream colors hanging around me!

Do you like coming up with seasonal palettes?

Photo credits (with licensed permission): Amir Jina, Jenny Downing, Rijks Museum

Making a Foam Cup Bra: Part 3

Today I’m going to finish my bra!

At this point I have two sets of cups–the foam cups and the outer coverings–and have also assembled my frame and band, including putting in the hem elastic. Most of the remaining steps are the same as your normal bra construction. If you need to fill in some gaps on constructing bras, check out the Bra-making Sew Along.

Covering the Cup

1. Before I start assembling the cups, I like to finish the neckline and underarm area of the foam cup with either narrow serging or a zig-zag. This helps to flatten the edge of the foam.

Making a Foam Cup Bra: Part 3 | Cloth Habit

Some bra-makers like to zig-zag around the entire edge of the cup but I’ve never had trouble with these edges being too thick. Experiment to find what you like…

2. To join the fabric cup pieces, line up the necklines with the right side of the outer cup fabric against the inside of the foam. Stitch 1/8″ away from the edge. (The distance between the needle and the toe of my presser foot is 1/8″, which makes this easy.)

Making a Foam Cup Bra: Part 3 | Cloth Habit

Turn out the outer cup piece to the front of the foam. It should look like this on the inside:

Making a Foam Cup Bra: Part 3 | Cloth Habit

3. Now we’re going to baste the cup fabric to the foam so the cup can be treated as one piece. Arrange and smooth the cup fabric gently so it lines up well around the foam cup and pin close to the edges.

Making a Foam Cup Bra: Part 3 | Cloth Habit

While you’re pinning, check the cup occasionally by rounding it over your your fist. This helps to make sure you haven’t pulled too hard on the outer fabric, and potentially flattened the cup. Depending on how stretchy your fabric is, it will sometimes go past the edge of the foam–that’s ok! You’ll trim this off later.

Once this is pinned and smoothed out, baste the fabric and foam together, keeping your stitching inside of 1/4″. (I stitched about 1/8″ away from the foam edge.) You are only going to baste the wire seam–the seam that goes into the cradle.

Making a Foam Cup Bra: Part 3 | Cloth Habit

After basting, trim away the excess fabric that hangs over the foam. I do this by running a rotary cutter around the edge of the foam:

Making a Foam Cup Bra: Part 3 | Cloth Habit

Man, that looks close to my finger…

Inserting the Cups & Channeling

1. Now it’s time to insert the cups into your cradle. There aren’t any special tricks here, but I wanted to show you what my hands are doing when stitch these in, because I don’t use pins when sewing in cups.

Making a Foam Cup Bra: Part 3 | Cloth Habit

I hold the top layer (the cup) slightly above the bottom layer (the cradle) until just before the two layers go under the presser foot. If you have a few notches that match the cup to the cradle, it will help as you are sewing. Sewing convex to concave curves are so much easier without pins!

Making a Foam Cup Bra: Part 3 | Cloth Habit

2. Once the cups are in, stitch in your channeling and topstitch as you normally do.

Making a Foam Cup Bra: Part 3 | Cloth Habit

3. Close your channeling in front and insert your wires. You’re almost done! All that’s left is putting in the underarm elastic, straps and hooks.

Underarm Elastic

There are a couple of different trickeroos to underarm elastic and foam. First, you don’t want to fold the foam cup back on itself in the underarm area and create bulk. That’s why we cut off the underarm seam allowance from the foam. (Note that a foam bra don’t necessarily need elastic in the underarm area–some RTW foam cups don’t have it–but the order of sewing is a bit different than what I”m doing here.)

1. Begin sewing your underarm elastic as usual. When you get to the cup seam, stop and backtack a couple zig-zags.

Making a Foam Cup Bra: Part 3 | Cloth Habit

Fold the excess cup fabric over the foam and pin it smoothly into place. Tip: Wonder Tape is genius for “basting” temporary little seams like this. For some reason I couldn’t get it to stick to the silk so I went with pins.

2. Now do your second pass of stitching. I do this from the right side so I can keep the cup fabric secured at the neckline.

Making a Foam Cup Bra: Part 3 | Cloth Habit

When you get to the cup seam, keep the elastic lined up underneath. Continue to zig-zag the same distance from the edge till you get to the end, and backtack a couple of stitches to secure.

Making a Foam Cup Bra: Part 3 | Cloth Habit

The finished arm elastic:

Making a Foam Cup Bra: Part 3 | Cloth Habit

Finishing Up

Time to put in your straps and hooks! I’m assuming you have a favorite method of inserting your straps.

Normally, I like to put the adjusters in front and often use a technique I described in this post to stabilize the ring “loop”. However, I did a dumb-dumb and forgot to cut the arm elastic long enough for a loop! Ah well. I put my adjusters in back, and secured the edge of the strap on top of the strap elastic to hide it neatly away.

Making a Foam Cup Bra: Part 3 | Cloth Habit

Stitch in your hooks and eyes, and you’re done! Annnd here is my finished bra:

Making a Foam Cup Bra: Part 3 | Cloth Habit

In case you are wondering, silk makes a lovely bra material! For some eye candy and silk bra inspirations (many with foam cups), have a look at Stella McCartney, Fleur of England, or the Rolls Royce of silk bra design, Carine Gilson. I’ve been wanting to knock off one of her bras for years. Her designs got me wanting to make bras in the first place… I’ll just have to practice a bit of applique first!

Credits: All Photos by Stephanie Press

See more posts in the series Make a Foam Cup Bra.

Making a Foam Cup Bra: Part 2

How to Make a Foam Cup Bra | tutorial at Cloth Habit

Today I’ll be cutting out my pieces and get started sewing. First, let’s make some some changes to your cup pattern to work with foam.

As I mentioned yesterday, these techniques can be used with any bra cups. I’d recommend starting with a pattern that you are familiar with making. It can have any kind of seaming. If your favorite bra pattern is a frameless bra (Kwik Sew 3300 is one example of these), there are tricks to stitching in the channeling in such a way that doesn’t fold the foam back on itself. I couldn’t cover that here, but hopefully this tutorial will give you a good place to start!

Here’s the pattern I’ll be working with:

How to Make a Foam Cup Bra |  tutorial at Cloth Habit

Sometimes I make these cups with a strap extension but for this tutorial I made a straight neckline to make things easier to follow.

[Edited to Add: The pattern I am using is not a commercial bra pattern for sale, but rather my own self-drafted pattern. If you are interested in turning a two-piece cup into a 3-piece cup, you might want to have a look at this tutorial.]

Pattern Alterations

1. Retrace your cup pieces so that you have two sets: one for the main cup fabric and one for the foam. It’s really a good idea to trace what will be your foam pieces onto some kind of heavier weight paper (card stock, watercolor paper, manila folder, anything that keeps its edge will do).

2. On the foam cup pieces, you’ll need mark in and remove all seam allowances along these three areas: the seams that go across the cup, the underarm, and the neckline. Don’t remove the seam allowances where the cup joins the cradle (the wire seam).

How to Make a Foam Cup Bra |  tutorial at Cloth Habit

Most bra patterns have 1/4″ (6 mm) seam allowances around all these edges, or don’t have seam allowances so you have to add them. I find it a good practice to keep seam lines marked in all my bra patterns so I can made accurate adjustments.

3. Next I consider how I want to finish my neckline. For this tutorial, I’m making a clean finish neckline, in which the cup fabric will roll neatly over the top of the cup.

On the fabric cup pattern, add a 3/8″ allowance to the underarm seam and the neckline. Half of this is seam allowance and the other half is cloth allowance for folding over the thickness of the foam.

How to Make a Foam Cup Bra |  tutorial at Cloth Habit

There are other ways to finish the neckline. If you want to bind the entire neckline with something like foldover elastic, you would cut off the neckline seam allowances from both the foam and main cup pieces.

If you want scalloped lace along the edges, you’d also cut off the neckline SAs from both foam and main cup pieces. I also shave a little bit more off the foam neckline on top of that–about 1/8″–so that it doesn’t peek out above the scallops.

Cutting

Now that all the pieces are ready, let’s get everything cut. When cutting from the foam, I gently hold down the pieces and trace around them with a ball point pen. (Sharpies and markers will bleed and make indefinite lines. Chalk and wax pencils don’t show up.)

How to Make a Foam Cup Bra |  tutorial at Cloth Habit

Cut away the lines…

How to Make a Foam Cup Bra |  tutorial at Cloth Habit

I also make tiny dots near the edge to mark the notch points (no snipping).

How to Make a Foam Cup Bra |  tutorial at Cloth Habit

Foam Cup Assembly

1. To assemble the foam cups, butt the pieces together so that the foam lies edge to edge and is centered right under your presser foot. You’re going to zig-zag them together. You can use either a triple zig-zag or regular zig-zag. Whatever width you use, make sure it is wide enough to catch both sides of the butted seam.

Making a Foam Cup Bra: Pt 2 | Cloth Habit

As I am sewing, I am trying to gently butt the edges against each other without leaving a gap, or without forcing or squishing the edges together.

How to Make a Foam Cup Bra |  tutorial at Cloth Habit

And here’s what it looks like stitched up:

How to Make a Foam Cup Bra |  tutorial at Cloth Habit

2. Totally optional: At this point I can consider the foam cups finished, but sometimes I like to cover the inside seams. Covering the seams can add a bit of support to the cup and make it prettier. But don’t feel like this is necessary–there’s nothing wrong with leaving them uncovered.

I’ve tried a few different seam coverings. Narrow cotton twill tape makes a neat, trim covering but it has no give. I also tried a single layer of tricot seam tape but this was far too flimsy. My favorite is a wide bias seam tape that has been folded into thirds.

First I cut 3/4″ strips of tricot along the bias. Then I pressed each side under by a little less than 1/4″ so that the resulting width of the folded tape was just a smidge over 1/4″ (6mm). I centered this folded tape over my foam seams and stitched down each side of the tape.

How to Make a Foam Cup Bra |  tutorial at Cloth Habit

You can also zig-zag down the tape (see the very top photo of this post). Sometimes stitching down either side can be tricky when you are first getting used to working with tricot. This stuff can be slithery and chiffon-like but it makes such a soft and delicate lining. I even use it as seam tape to cover delicate seams in silk dresses because it practically disappears and never ravels.

3. Now go ahead and assemble your main fabric cups.

How to Make a Foam Cup Bra |  tutorial at Cloth Habit

At this point you should have two sets of cups, one from foam and one from your outer fabric. On Monday I’ll finish off by showing how I cover the cups and stitch them into the cradle. In the meantime, you can go ahead and assemble your band the way you normally do and add your hem elastic.

Happy weekend!

See more posts in the series Make a Foam Cup Bra.