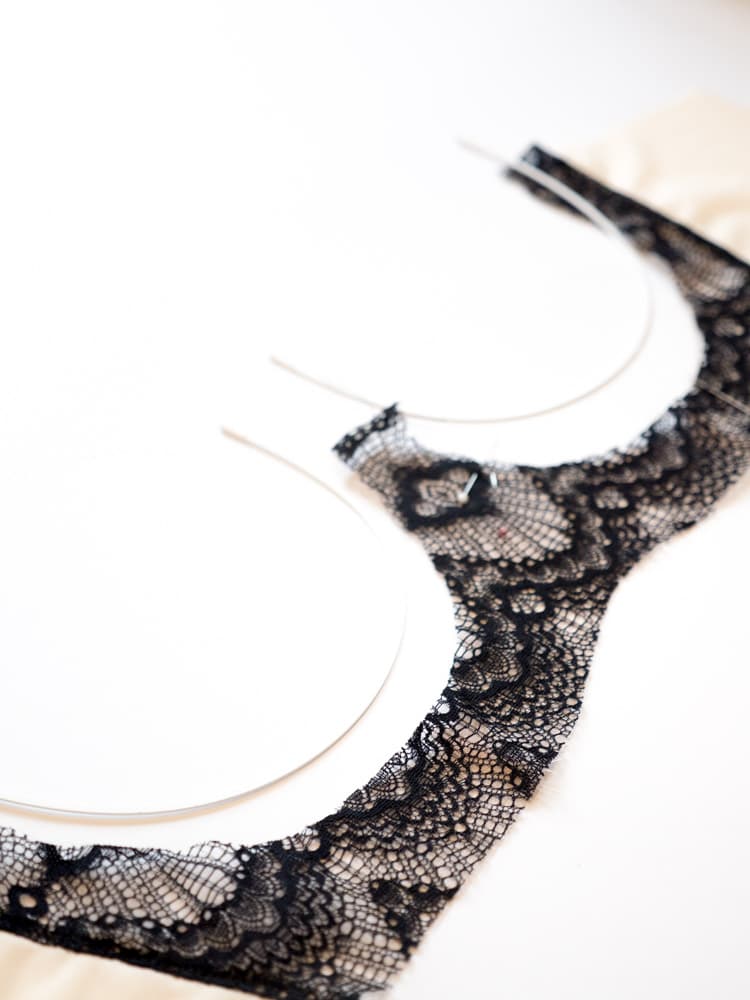
I’ve been on a little bit of a Harriet binge lately, in part motivated by a desire to use up a bit of my precious lace stash. While recently sorting through some of my bins, I had my first experience of supplies gone bad–I found a few rusted rings and sliders and elastic that actually crumbled when I pulled it out of a bag. Despite my careful inclusions of silica gel packs in tightly sealed rubber bins, I’ve discovered that “aging stash” isn’t always a good thing!
Anyway, this week I made the pattern in a 32G, and sometimes in the larger cup sizes I like to switch out to a wire with a narrower profile. The narrow wires I have happen to be a bit longer than the “regular” wires around which I drafted the pattern, so that also means I had to make some changes.
I get a lot of questions about substituting wires so today I want to share a few tips on choosing and underwire–and what to do when the wire you want doesn’t fit into the size you choose.
Choosing an Underwire
Harriet was drafted around regular length wires from Bra-makers Supply, and I suggest buying these if you don’t want to be bothered with cutting wires or making adjustments. These wires are a good everyday-wear length for many women, they are very good quality, and were perfect for the kind of coverage I wanted from the Harriet.
If you look at the back of the pattern, there is an underwire chart. This will show you which wire to use for your size:
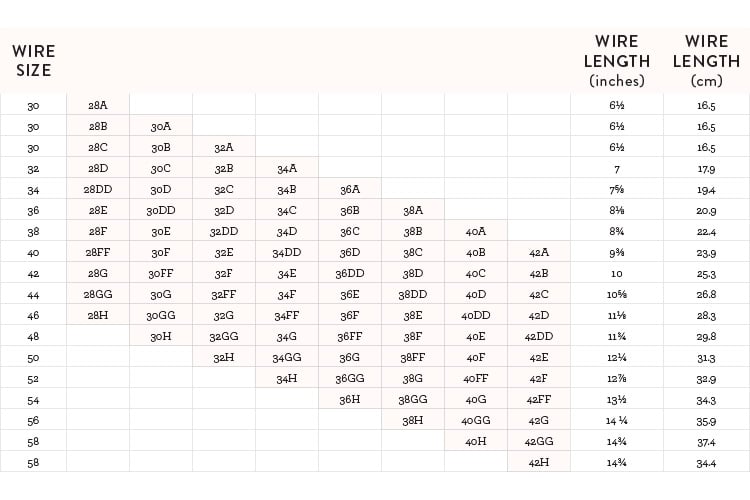
The length on the right of this chart will tell you the maximum length your wire can be to fit into the bra channeling. I included this because I know many people will buy their wires from a different source, or perhaps prefer to use a different size or shape of wire. In all these cases, it’s important to measure you wire to ensure it will fit.
Something to note if you are new to bra making: there are no standards to shape and length for sizes in wires. So if you purchase a wire from another shop, even if it is the same size as your suggested wire size, it could have a very different length.
(I’ve also written previously about underwire styles and fitting, if you’d like more tips on wire fitting.)
HOW TO CUSTOMIZE THE WIRE LENGTH
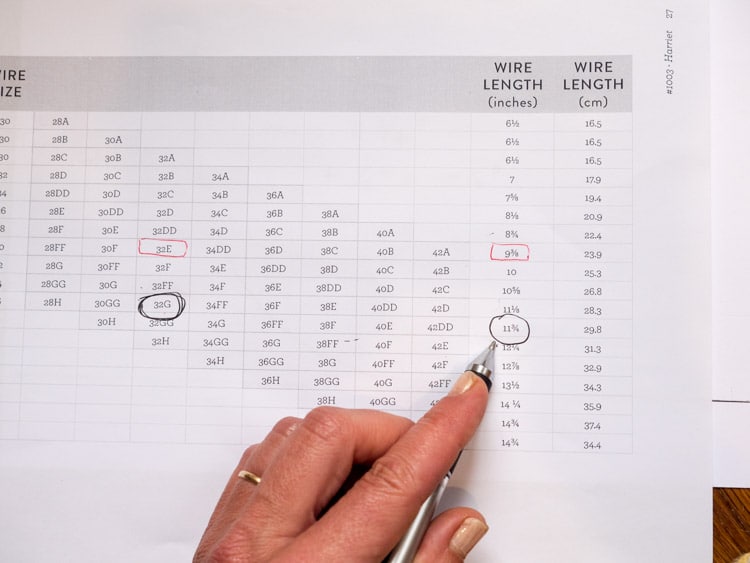
1. Find your wire size
First find the wire length in your chart. For example, I’m making a 32G and the recommended wire length is 11 3/4″.
2. Measure the length of your preferred wire
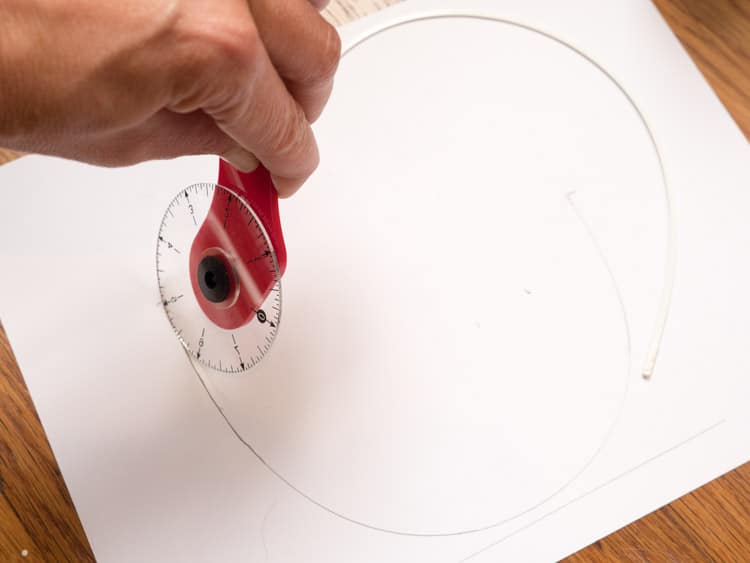
Trace the inside of your preferred wire from tip to tip.
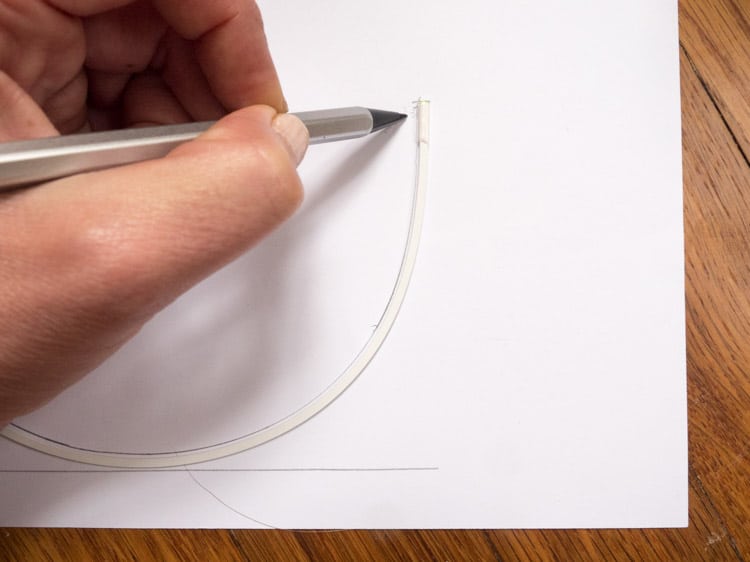
Now measure the line with a measuring tape. I suggest doing it twice to make sure you are getting a correct measurement, since measuring tape can be finicky. I like to use one of my fave measuring tools, the Curve Runner–this thing is genius for measuring curves on a sewing pattern!
3. add some length for wire play
Finally, add 1/2″ or 15mm to that measurement–this is how long your channeling seam needs to be in order to fit your preferred wire.
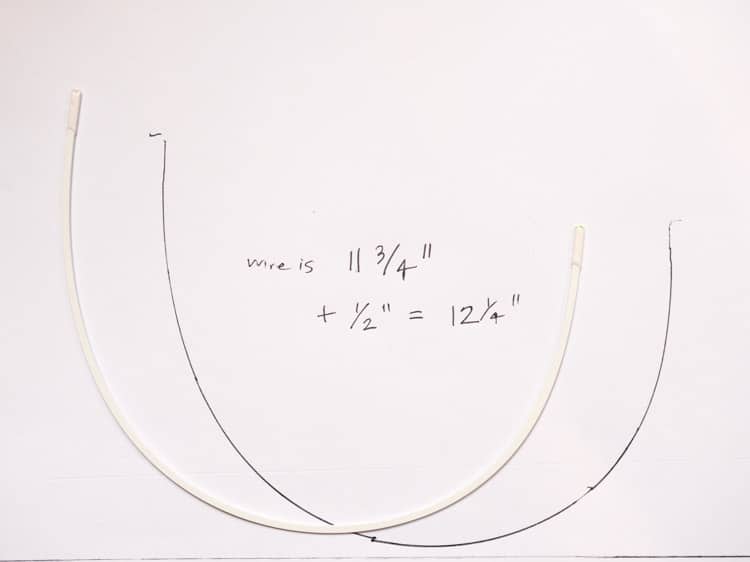
The extra 1/2″ is for wire play, which allows the wire to move a little bit during wear. Otherwise, the wire will cause some stress and possibly tear the channeling.
My new wire length is 12 1/4″ which is 1/2″ longer than the recommended length for the 32G.
4. ADJUST FOR A LONGER WIRE
If your new wire seam length is longer than the wire length in the pattern chart, add the extra length to the pattern itself OR cut the wires to the proper length. In my example of the 32G, I’d need to add 1/2″ in length or cut 1/2″ off the wires.
You can add length to the underarm or the front (or both). This will depend on your preference in fitting, but if it’s a small amount I tend to make the change at the sides. To change at the underarm, add the length to outer cup and the wire seam on the outer cradle.
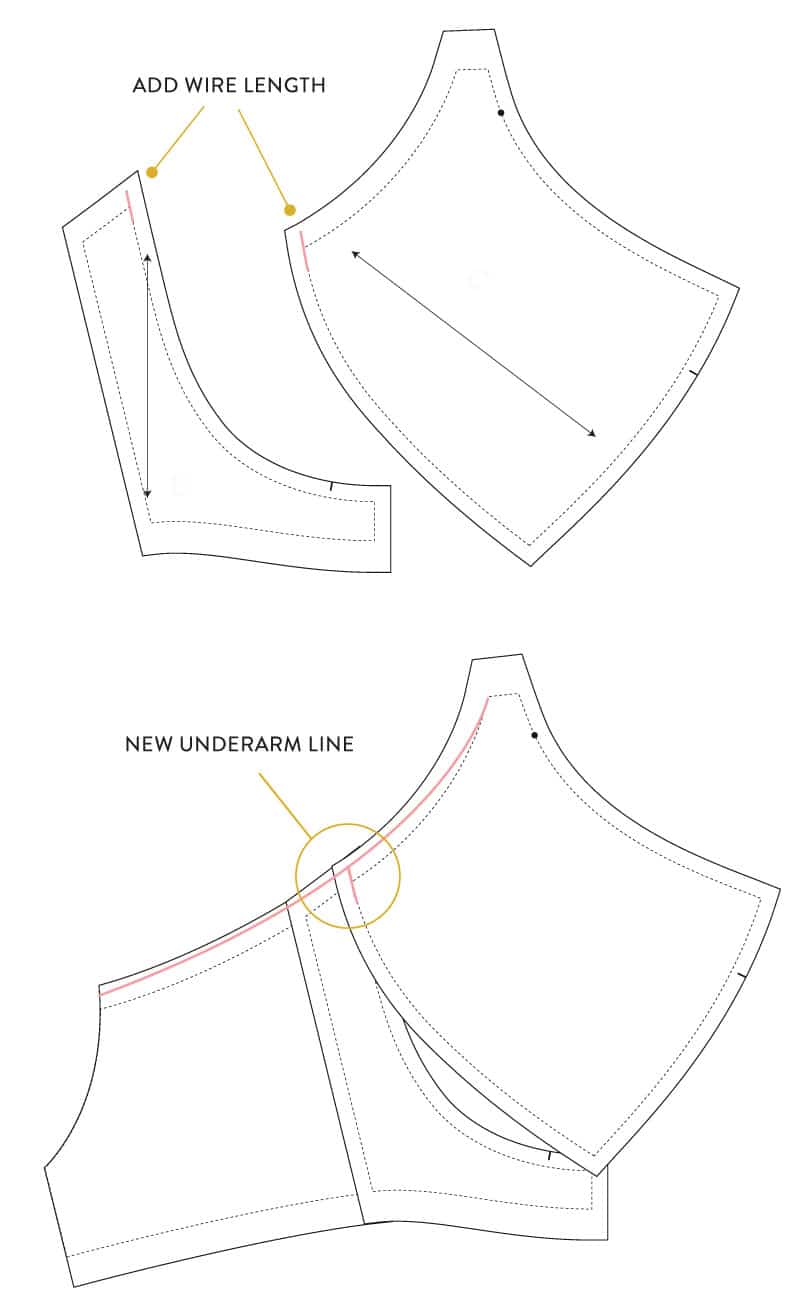
Once you lengthen those areas, smooth the line from strap all the way to the back. As demonstrated in the bottom illustration, line up the outer cup, outer frame and band along their stitching lines and true this line.
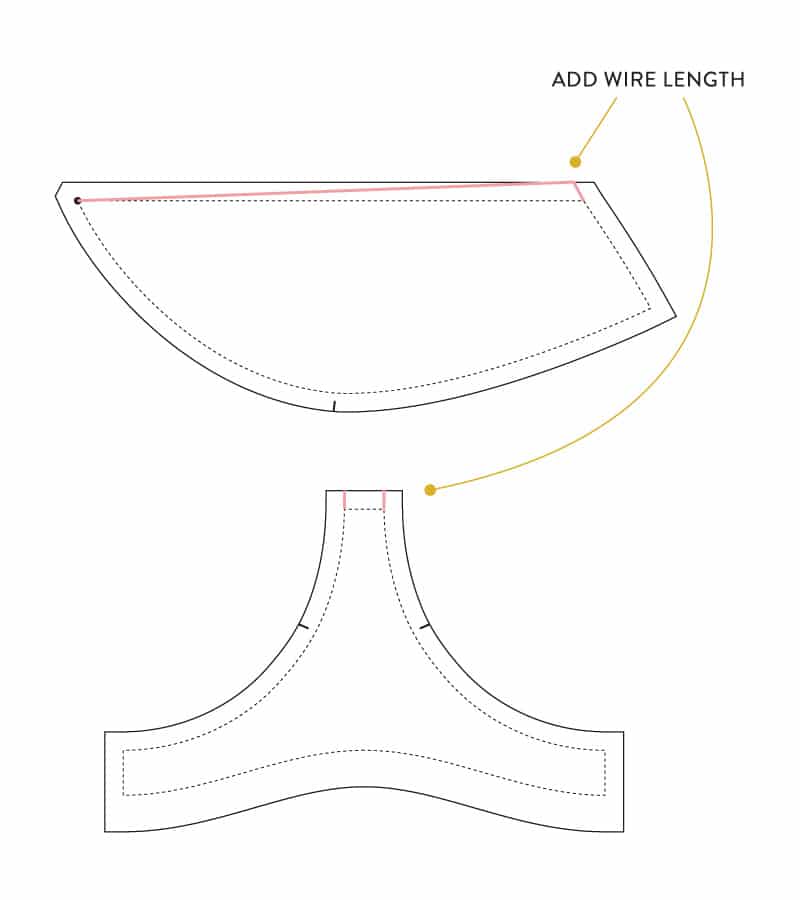
To change the front:
The other option is to cut your wires. You can cut just the front or just the side or both.
Cutting wires is my preferred method. It’s incredibly easy–takes less than 30 seconds! If you plan to make this pattern more than once, I highly recommend you get yourself some cutters. I use these Knipex mini bolt-cutters (they cut through every wire like butter) and 1/16″ heat shrink tubing to cover the cut tip. (Both will last you forever.)
5. Adjust for a shorter Wire
If your new wire length is shorter than the length in the wire chart, usually you can cut the pattern as is. No adjustments needed!
However, if the difference is more than 1/2″, I recommend changing the pattern by lowering the bridge and the seam at the underarm a bit. Otherwise the bra’s edges are going to fold over your wire (it’s really annoying to wear, trust me!). To lower the seam, make the exact opposite alterations as illustrated above–take out length on all the same pieces and smooth the edges.
On combining sizes
One of the questions I’m often asked is along these lines: I want to use 34F in the cup, but need a wire that fits 34E. Should I cut a 34E size in the cradle and band and adjust the 34F cup to it?
This is possible, but in my experience adjusting a larger cup to a smaller cradle can have unintended fit issues and run into wrinkling in odd places. Part of this is because you end up with a different cradle width as well as length. I recommend the above alterations before messing with franken-sizing. 🙂
a note on plunge wires
The only wires I don’t recommend for the Harriet are plunge-style wires. These wires have a very short and splayed front “arm”. Adapting the pattern for these would require significantly changes to the front and sides. This changes the bra’s silhouette but more importantly you’ll lose some of the pattern’s support in the front. (If you really want to play with plunge wires, cups with a vertical dart or seam/s work really well with plunging styles, and there are also plunge-specific patterns!)
I hope this post clarified how to substitute wires. (And convinced you that wire cutters are awesome.) Please feel free to ask any questions in the comments!
Would you like more fitting tips? Every other week I tackle a bra fit question or alteration in my newsletter, The Lingerie Maker.
Hi Amy!
I love the Harriet pattern, and I love your blog!! I hope the fact that you have not been blogging very often lately means that your offline life is rich and satisfying and that you are in a good place.
Still, it is really great that you have been posting some tutorials for adjustments to the Harriet pattern during the last year. Do you by any chance plan on writing a tutorial about how to make a Harriet lined with foam? I have been trying on my own these last few days, using your How to Make a Foam Cup Bra series, but there has been loads of head-scratching about how to transfer the tutorial from a two-piece bra to a three-piece bra as sophisticated as the Harriet… Especially the question of how to preserve the upper-cup-to-outer-cup intersection is really challenging my imagination. So whenever you find the time and inspiration to post some tips on this front, they will be SO welcome!
Have a great week!
Elisabeth
Hi Elizabeth, thanks for the suggestion! Many people have asked for help with this!
Since releasing the Harriet, I’ve played with a number of methods of adding foam. What’s interesting is that you rarely see this particular cup style with foam linings in RTW. I have a few theories why this is but long story short, the best results require some pattern alterations and a slightly different method of sewing and lining the strap. I’ll be including a few tips for this in my upcoming video class and possibly a separate pattern extension to help with it. Stay tuned for that!
And also I’m doing great. 🙂 This year I’m focused more on my newsletter and teaching live classes so not as much blog posting but there will still be blog posts from time to time.
Hi Amy,
this is great to hear (all of it ^^)! Btw you do not by any chance happen to teach live classes in Europe anytime soon? I would be thrilled to attend! Until then, I am looking forward to the video class.
All the best from Germany,
Elisabeth
No classes in Europe but if a workshop/shop wants to hire me, I’m all ears. (I love Berlin!) 🙂 My current class schedule is here: https://clothhabit.com/classes/
I second the foam cups request, want! If I buy the pattern now will the foam cup extension be available to previous customers or should I hold off till the pattern is updated? I’m scared I’ll mess up if I try to go it alone with foam! I made your Watson – https://www.corsettraining.net/project/the-watson-bra-pattern/ my first successful bra thank you! but I’m not a soft cups gal, I’m actually hoping to learn to add cups to the corsets I make and a Harriet corset would look amazing! (personal use only of course) foam is a must for outerwear cups I feel hoping to blog about a bra pattern + corset pattern hack as I get so many requests for it. Do you have plans for more patterns in the future? I’d love to see a plunge design from you your pattern drafting is beautiful. I’ve seen gorgeous images of the Harriet in both large a small sizing extremes, bravo on such a perfectly drafted pattern! xxx
Hi Scarlett, thanks for your kind words. A foam pattern extension is still in the ‘research’ phase but it would be a separate product, not an update to the pattern itself. So no need to hold off if you want to purchase before then.
And I have more pattern ideas for the future–too many, actually! But a plunge is at the very top of my list. 🙂