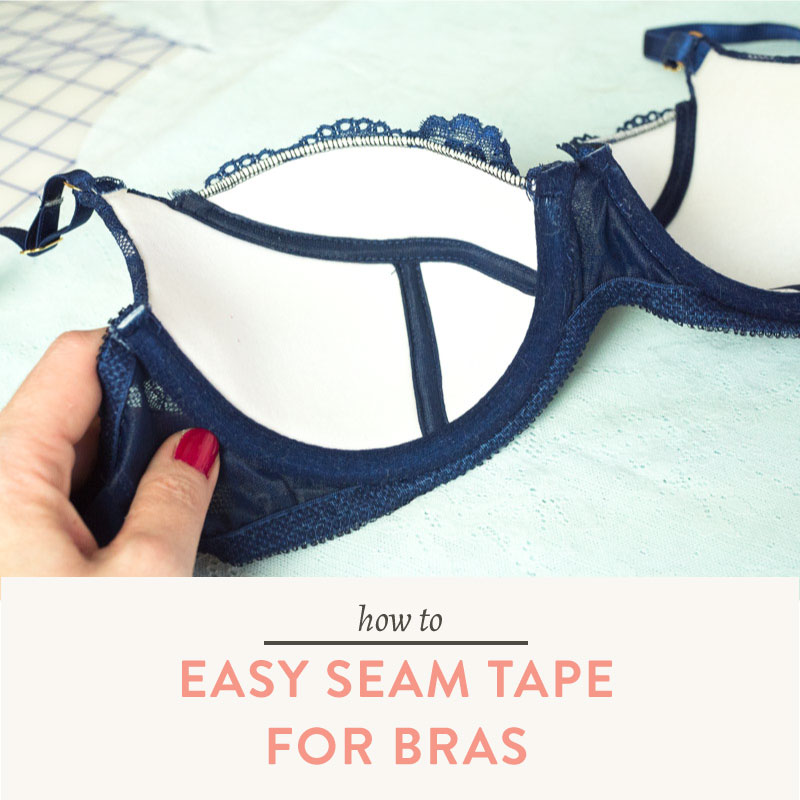
There are many ways to finish bra cup seams and I love experimenting with different techniques. Most of the time I line bra cups with a sheer lining because I love the way lining feels and it’s an easy, neat way to hide cup seams. You can even line the insides of foam cups if the seams are bothering you.
But what if you don’t want a lining? Enter seam tape!
This is my favorite way to cover and neaten foam cup seams, and it’s also a common treatment for ready to wear bras that don’t have a lining, both foam and non-foam. I’ve had a lot of questions about how I make seam tape for my foam bras (like this one) so today I’m going to show you! This weekend I was working on a new bra and I shot a spontaneous video to show you exactly where this mystery tape comes from, and how I use it.
I always knew that the second I got into knitting, I’d have a hard time stopping. It’s like the Tetris of handcrafts. And sure enough, once I started this I was having a hard time putting it down.
It all started with a late night browsing of Purl Soho, which is a rabbit hole of beauty. I’ve bought Liberty fabrics and Sashiko kits from them in the past, and every time I’ve shopped there I ended up buying more than I should have. (Embroidery threads are sooo beautiful, aren’t they?) Sure enough, an hour later I ended up with a mini stash of quilting fabrics and yarns.
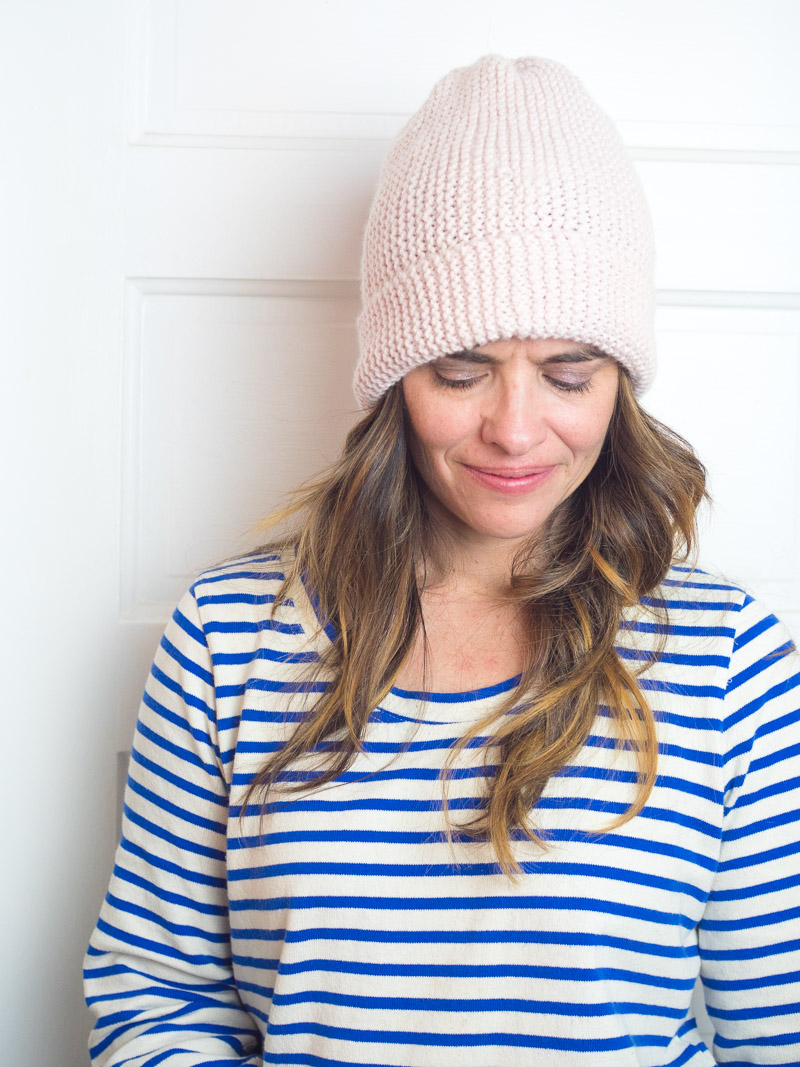
For my first project I started out with their Learn to Knit kit which includes a pattern, needles and enough yarn for a hat and handwarmers. The hat is a simple flat project, and it involves just one stitch (the knit stitch) over and over.
This project is perfect for total beginners because it limits the number of tasks you have to concentrate on until you get to the finish line. That’s a good thing when you know absolutely nothing. I got halfway into the project before I really understood how to hold the needles and keep my yarn from falling down! Finding those basic rhythms are so awkward and slow at first.
I’m an absolute newbie, and I kind of like that. Every term was alien to me. What the heck is cast on? Gauge? My beginner pattern said “slip a stitch knitwise” as if I knew what knitwise meant. I even confused stitches and rows. (I thought each stitch was a row.) And that’s what Youtube is for, right?
While my pattern had great pictures and instructions on how to knit and hold the needles, it’s hard to learn from photos alone. Watching someone knit is infinitely more helpful! So I signed up for a Craftsy class, Knit Faster with Continental Knitting with Lorilee Beltman. For the total newbs, continental knitting is a style in which you tension the yarn in your left hand and “pick” the yarn with your right needle. I’m a leftie and I’d heard this style is a bit more “hand neutral” than the English style I tried to learn many years ago.
This course doesn’t have projects, but Lorilee teaches all the basic stitches and the class is paced perfectly for a total beginner. She explains everything as if you had no previous knowledge, and knits verrry slowly while phrasing through the rhythms. That’s super helpful if you want to knit along and practice.
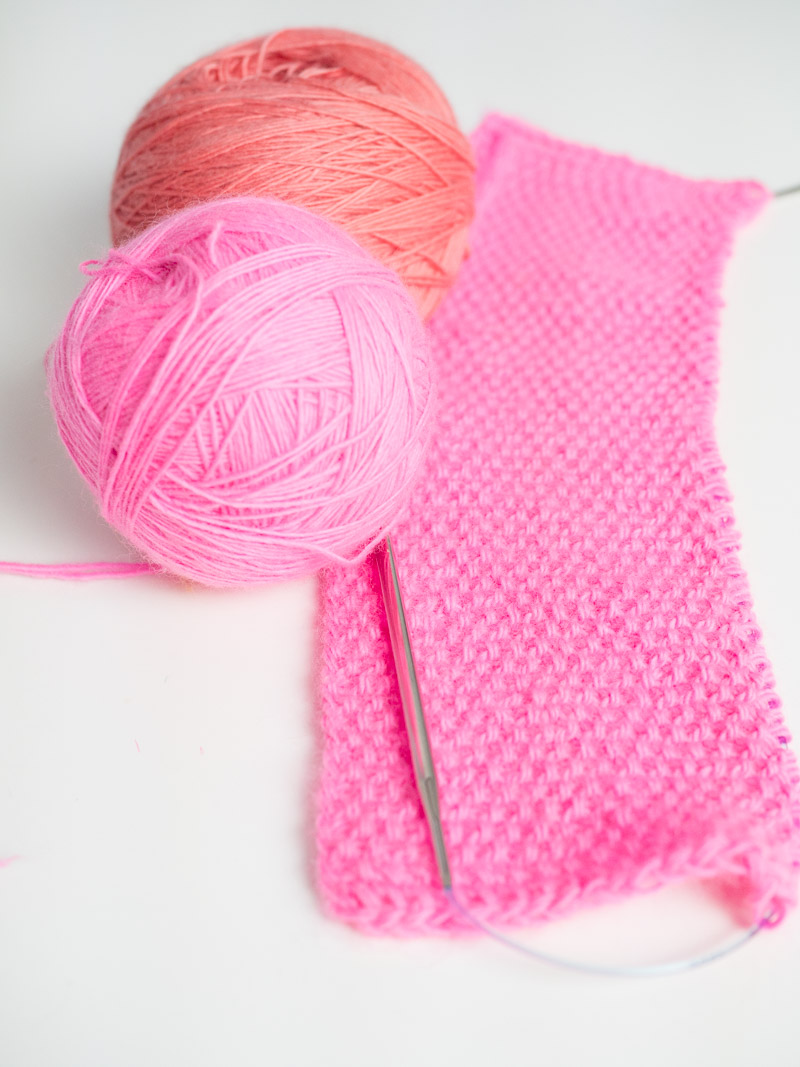
Needles are another topic that need explaining, and the class helped with that. My kit included beech wood needles but knitting with these was harder than it needed to be. I felt like I was forcing the yarn off the needle with every stitch, and poking my ribs with the ends which wasn’t exactly relaxing. Halfway into my hat I ran out and bought a pair of metal circular needles, and whoa, what a difference!
I’m already at work on my second project, another Purl Soho pattern made with seed stitch which I just love.
Any other newbs out there afraid of knitting? It really only takes a couple of knitting sessions until you get the swing of things. It definitely helps to work with lovely yarn you like to look at and touch. I blame fugly yarns for losing interest the last few times I’ve tried to learn!
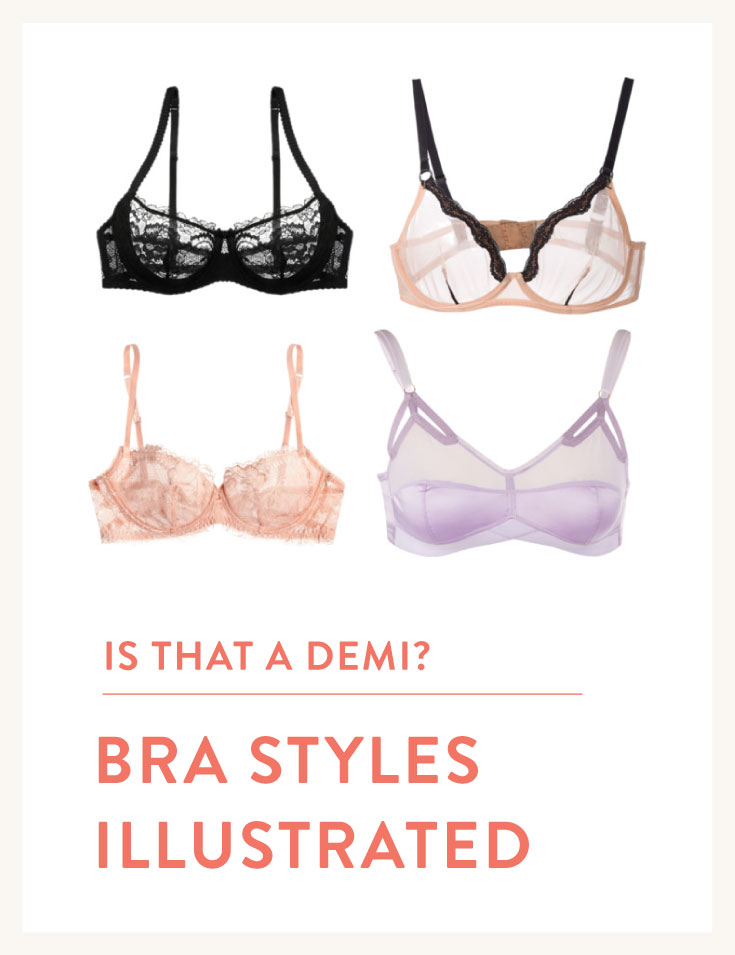
(Journelle, Fleur Du Mal, Araks, La Perla – see the Polyvore set)
When I first started making my own bras, I was dead set on having a “demi bra”. Mind you, I had no idea what that really meant but the bra in my imagination was something other than the patterns I had tried.
I’ve realized since that what I really wanted was a bra that felt “designed”, that had colors, textures and feelings–good design ideas. And for some reason the term demi conjured up prrretty.
I’m guessing that for some of us, a demi might anything that isn’t a full cup bra. “Demi” and even “balconette” are often used fairly loosely by retailers and designers which makes them even harder to pinpoint. All of the bras in the image at the top were ones that either a shop or designer listed as “demi”. And they all have different coverage and design shapes.
So today I want to refine these bra terms a bit more, the way I understand them–through their neckline shapes.
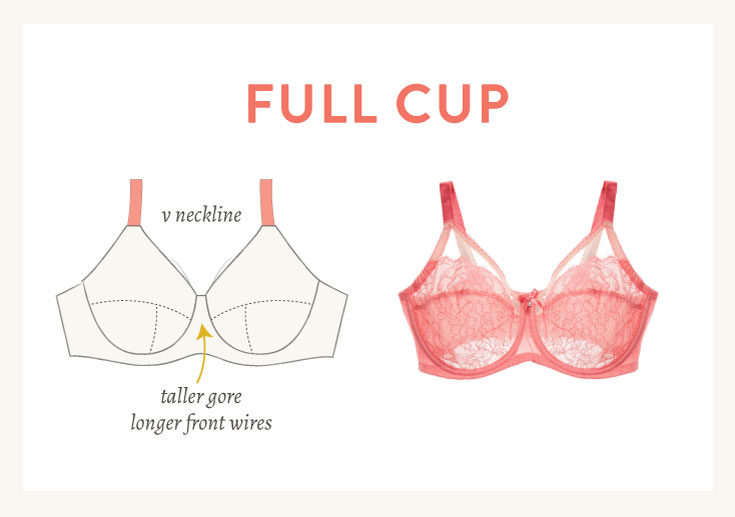
Full Cup
A true full cup bra is one that covers much of the top half of a breast.
In these bras, you may notice that the upper part of the cup is higher–almost equal in height as the lower cup–and the straps are quite centered, starting higher up on the chest. (I really love the above example by Wacoal–goes to show you that a full cup doesn’t always mean beige and boring.)
Typical features of a full-cup bra:
longer wires in front and sides
high gore (bridge)
wider band at side seam (as a result of longer wire)
centered straps
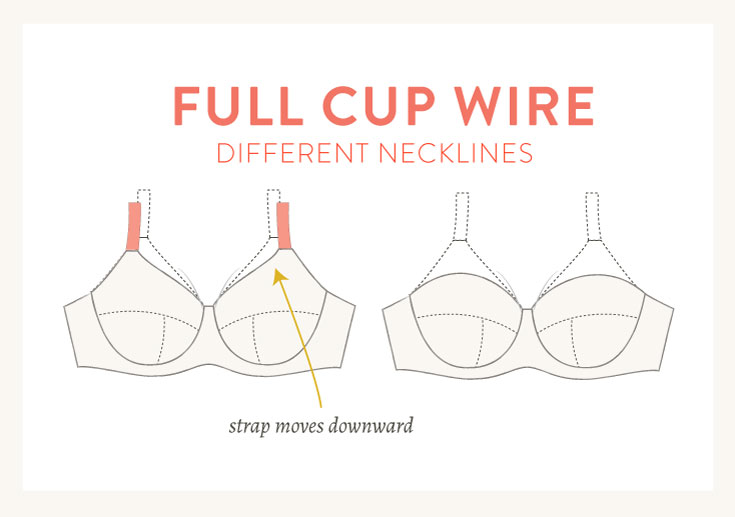
You can take the same exact wires from a full cup bra and create styles with a lower neckline. This involves moving the strap position, or in the case of a strapless bra, removing the strap altogether.
In these styles the height of the center front stays the same as the full cup bra, but the neckline gets slightly more “squared” as the strap extension is lowered or removed.
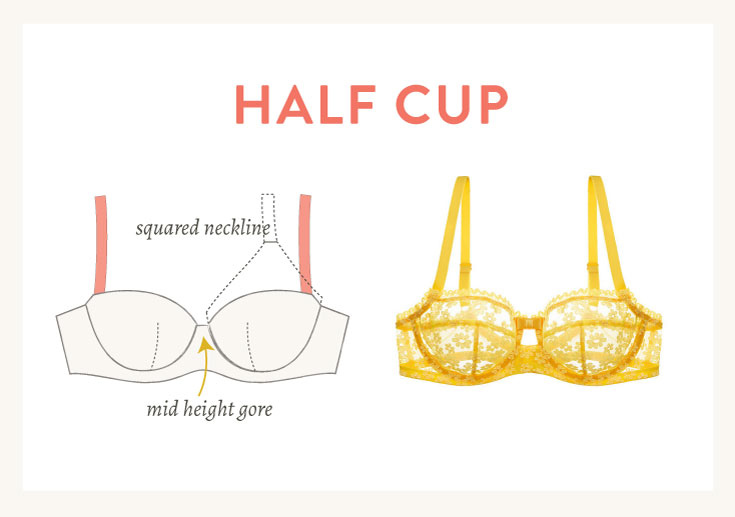
The Half Cup
This is the style many associate with “demi”.
The word “demi” means “partial” or “half”. While most of the bras I’m illustrating in this post are technically “partial” in coverage, a half cup has a particular look. It is usually a low-cut cup with a squared neckline that encourages little bit of cleavage.
Some brands are really known for this style, such as Agent Provocateur, Simone Perele and Huit. Also take a look at half cups over at Bratabase (a bra review community) for examples in DD+ brands.
Typical features of half cup:
Wires are often at equal heights in front and sides.
Usually have a vertical dart or seam, or two vertical seams for larger cups. (The yellow Huit bra in my example is an exception with its horizontal seam.)
There’s a reason for the vertical seams, from a patternmaking perspective. Vertical seams make it easier to create a low and more open neckline while keeping the bottom of the cup a little bit more shallow, thus forcing the breasts upward.
I’ve made a couple of bras with a half cup style, one of which was this mint bra I made way back for the Bra-making Sew Along.
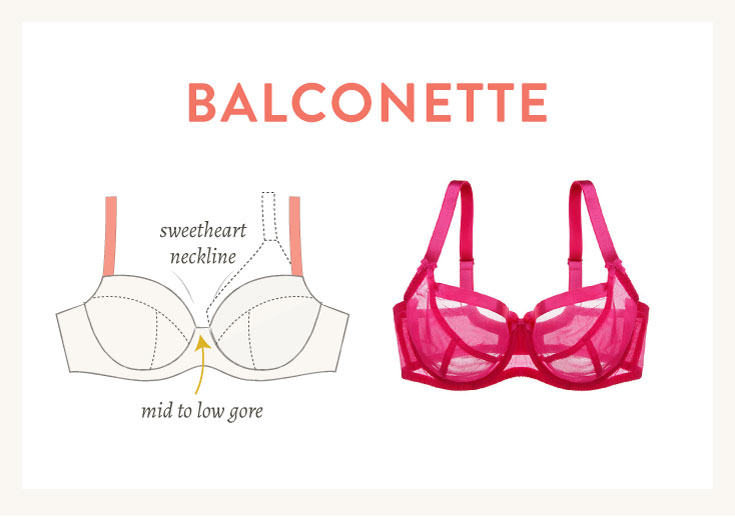
The Balconette
Here’s another term that’s used quite broadly–search for balconettes and you will find a range from very low-cut half cup styles to fuller-cup bras with a more revealing neckline.
I tend to think of a balconette as any bra that creates a sweetheart neckline.
A lower bridge, and the front is lower than the sides.
Often 3- or 4-piece cups with seams in opposing directions (the extra seaming allows for a more shapely, contoured neckline).
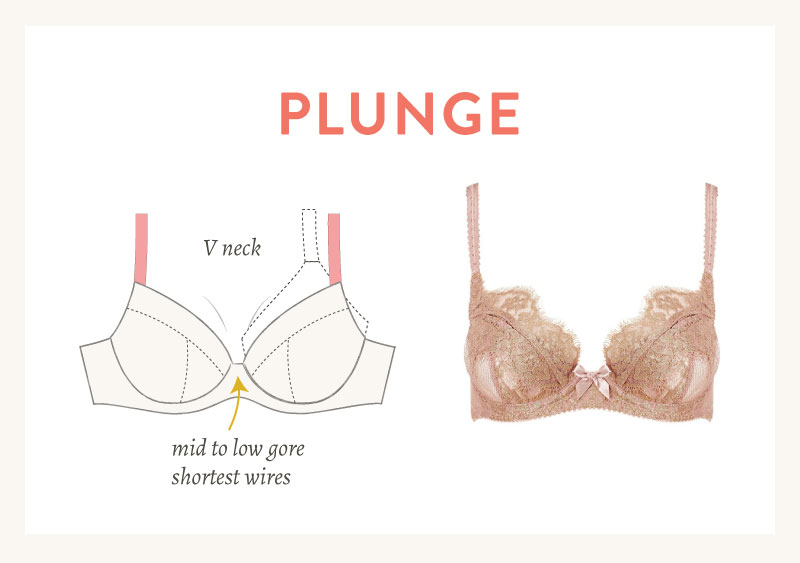
The Plunge
A plunge bra often has a “v-neck” appearance to it, just like a full cup bra, except of course that it plunges down between the breasts. Underwired plunge bras have dramatically shorter wires in the front.
Lowest wires of all, often with a slight diagonal tilt in the front.
Narrower bridge (gore), especially in push-up bras.
In bralettes or soft cup bras, there is often no bridge (like the Watson, which is a plunging style neckline).
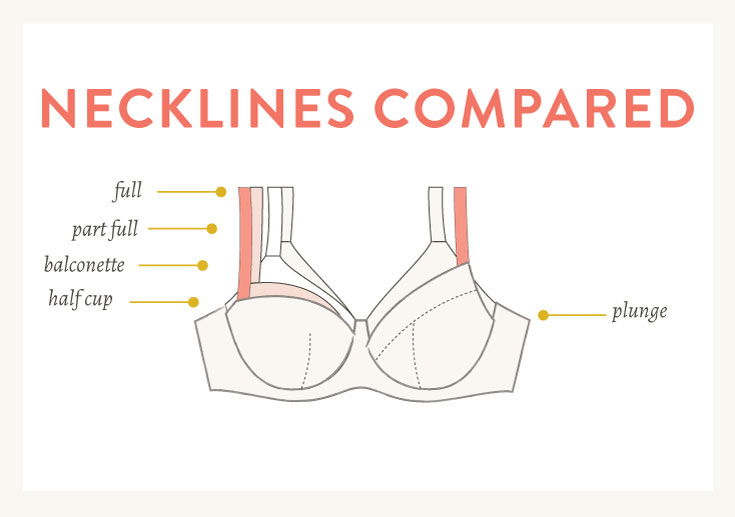
It’s all about the neckline
In this illustration I’ve laid all these styles on top of each other so you can see how their necklines compare:
One thing to notice is that a bra’s neckline shape and coverage is really determined by two things: the wire height (if it’s a wired bra) and the strap position. Both of these are really easy to change in a bra pattern!
Shorten the front bridge and wire, and you start plunging the front neckline into more of a v-shape. Move the straps downward and outward, and you start creating more of a balconette or half cup. (For some ideas on how to do these things you might like my posts on cutting wires, cup alterations, or design alterations.)
I hope this analysis helps you understand bra styles a bit more and perhaps narrow in on why you like certain styles more than others!
For example, I often find myself creating plunge like bras because I like low wires (more comfortable on my sternum), I don’t need high wires but I like my straps a bit high and more centered.
When I was a child, I loved keeping diaries. Sometimes I’d write poems, or chronicle what I did that day, or wax about my first crush on a boy in Algebra class named Derek. (I ended up marrying a Derek!) I was particularly into composition notebooks because that’s what my hero Harriet the Spy used. Like Harriet I wanted to be a writer when I grew up, and composition books seemed more “writerly” than Hello Kitty diaries with locks on them.
I have a couple of boxes in storage that are full of those diaries from different periods of my life, and every so often during a spring cleaning I go back through some of them. Not only are they a window into my past but sometimes I’m pleasantly surprised to find something that has potential to be a real piece of writing.
It struck me recently that I never do this with my blog entries. When was the last time I went back and read through my own archives?
I’ll admit that I often forget to reflect on what I’ve enjoyed or accomplished in the past because let’s face it, blogging (and even more so social media) is all about the now. Instagram is all so… instant.
So today I’m thinking of ways to value what you’ve previously worked at.
Tend Old Blog Posts
If you blog, there’s a good chance you have some oldie but goodie posts hanging out somewhere deep in your archives no one can find. These might not necessarily get pulled out by a “related posts” or “favorite posts” widget into your sidebar.
Why not curate an intentional list of these in a menu or sidebar? They might be:
A favorite project of yours that really shows off your skills or changed your sewing life.
A hot topic or opinion that generated a lot of discussion.
The story behind your blog’s name.
Your five favorite pattern reviews.
Your most-visited tutorials. You can look at stats to see what those are.
The post where you wrestled with pants-fitting. I LOVE THOSE KIND OF SEWING POSTS. I’m certainly not the only one who does. I’ll search through your archives to find them! I glean a lot from others’ fitting processes.
It doesn’t matter how often some of these posts are still visited, of if your blog mission has changed. I love going back and reading what sewing bloggers consider to be their favorite projects and seeing how they evolved. It’s nothing to be embarrassed about! We all love a good story.
And if you have a particular post or series that readers visit often, tending these is just as important as creating new posts. For example, my Bra-making Sew Along posts are a couple of years old but still the most-visited on my website. A few bits of information are out of date but most of the actual tutorials are timeless and useful to first time bra makers.
So I’ve been tending these by fixing grammar mistakes, updating links or information. I’m also in the process of re-editing a few photos (because I’ve learned so much about photo editing since then!). I leave the comments open so readers can ask new questions.
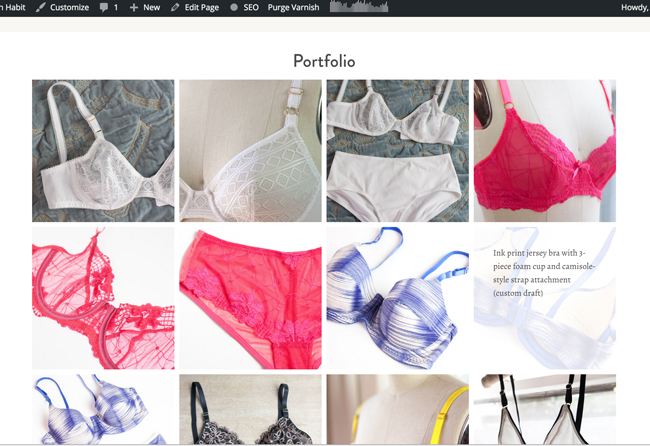
Create a Portfolio
Another way to highlight past favorites is through a photo portfolio. And if you blog or use Instagram you probably have a mile of them you’ve forgotten about!
I created one for the purpose of highlighting professional work (it’s a work in progress), but you don’t have to be a pro to have a portfolio.
Even if it is just for you and no one else, a digital portfolio is a wonderful way to cherish your previous hard work, and a healthy self-reminder when you ever feel as if you can’t keep up: you create more than you think you do.
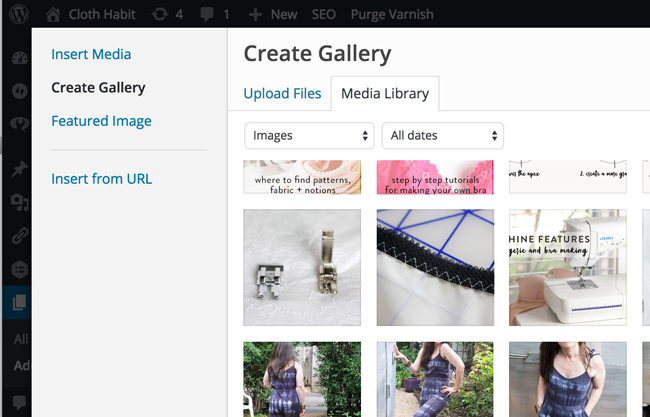
Of course you can create off-blog portfolios in Pinterest or Flickr but it’s easy to add one straight to your blog, especially if it’s a WordPress blog.
Both self-hosted and wordpress.com blogs have a built-in gallery creator. To use this you would need to create a separate page for your portfolio, then use the Media Uploader to create a gallery that you insert onto that page.
If you want to get fancy and have those gallery photos open into a big lightbox, you can turn on Jetpack’s Carousel.
Those with self-hosted WordPress blogs have even more options. Many WordPress themes offer their own gallery page templates which may offer more advanced features than the standard WordPress gallery.
The super tinkerers out there might want to try a gallery plugin. These are good options for those who really want a professional portfolio and better image management. Photo Gallery and Envira are two of my recommendations.
You can even curate Instagram photos into a gallery! Some full-blown gallery plugins offer Instagram integration but there are simpler options, like Enjoy Instagram, that only focus on Instagram. This lets you curate a portfolio from of a particular hashtag.
These are just a few ideas for valuing your past work.
By digging around my blog, I’ve been pleasantly surprised by some things I’d forgotten about! It’s fun to go back and read that the first entry I ever wrote, if only to remember how I came up with this blog name. (My friend Hannah helped me out with it, because I’m terrible at titles!)
—–
By the way, it’s probably obvious I recommend WordPress for blogging! For beginners I recommend starting with wordpress.com which is easy to set up and make pretty. (Blogger has way fewer options in creative layout and comment moderation, and Google doesn’t seem to spend time improving it as a web product.)
Today I have a special treat for you guys. A few months back I started writing up a dyeing tutorial. The whole time I kept thinking, this should really be a video. It was time for me to break out the camera and lights and try something new!
If you have been following along with my bra making adventures, you know how much I love dyeing my lingerie fabrics. I started doing this because it wasn’t easy to find matching notions and fabrics.
Bra making kits are one solution to that, and for many they are an easy way to jump in and get going. Sometimes it’s just nice to have someone else curate those decisions for you, isn’t it?
But I’ll admit that I’m a bit of a color perfectionist. My husband and I are in the middle of a kitchen renovation and picking a white paint that won’t clash with the white appliances has been an entire process in itself! (I have to go back to the swatch in the morning, in the afternoon, at night by the kitchen light. Because light changes everything!)
Dyeing gives me more choice but also lets me get closer to those colors I have in my brain. And honestly, I just love playing with dyes.
In this first video I introduce you to a few types of dyes.
It’s easy to get confused by the various brands and dye types out there and how to use them. So before you reach for that cute little packet of dye at the craft store, check this out!
Watch
In my next video I’ll show you exactly what an acid dye “recipe” is, and dye materials for one of my bra sets. It’s super simple, and much quicker than you think!
Where to Buy Acid Dyes
I mentioned three brands of acid dye but there are more. Here is a list of acid dyes with links to where you can purchase them: