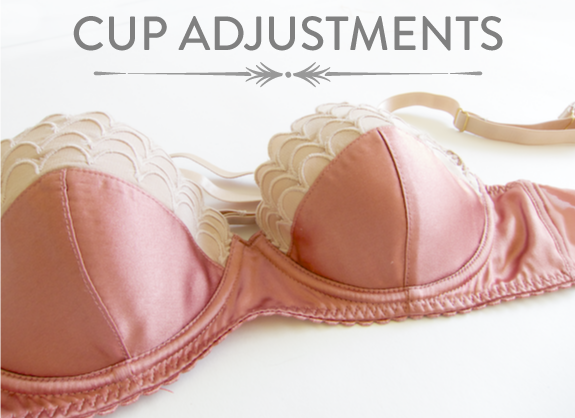
Continuing on with fitting adjustments, today I’ll walk through some possible alterations to your cups.
Some tips for working with these alterations:
- Mark in your seamlines on your pattern so that you can measure exactly how much you want to adjust.
- The best way to determine your alteration is by pinning out excess along the cross-cup seams, neckline or arm edges of the cup to see if that helps things fit. If you need more room you could cut a bit into areas of your tester bra to see what alleviates tightness. Measure how much you needed removed or added and write it down. I keep the pins in the bra so I can measure my little “darts” after I take it off.
Overall volume adjustment
If you simply want to add or remove more overall volume in the cup, pinch out darts along the main seams until the cup feels comfortable. Measure out this amount along the cross cup seamlines. Spread or close the dart and redraw the seams.
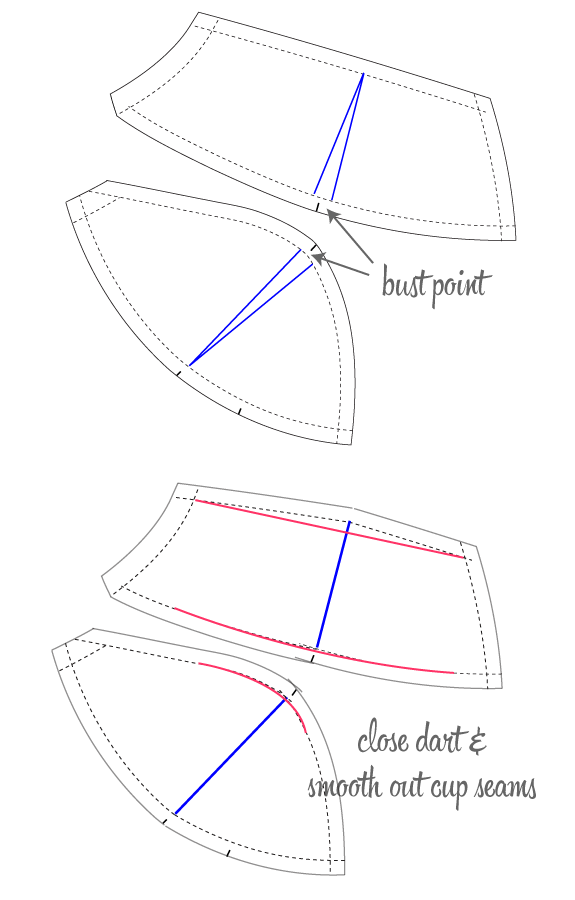
I’m just showing one adjustment right at the bust point but if you are adding or removing a lot of volume, you may need to make several little darts or slashes along the seams so that you make an even shape adjustment across the cup.
Adding or Removing Lower cup volume
If you notice excess fabric pooling at the bottom of your cup, you may need to remove some of the volume from the lower cup. Pull up the lower cup and see if you can pin some of it out. This adjustment could also help lift the cups.
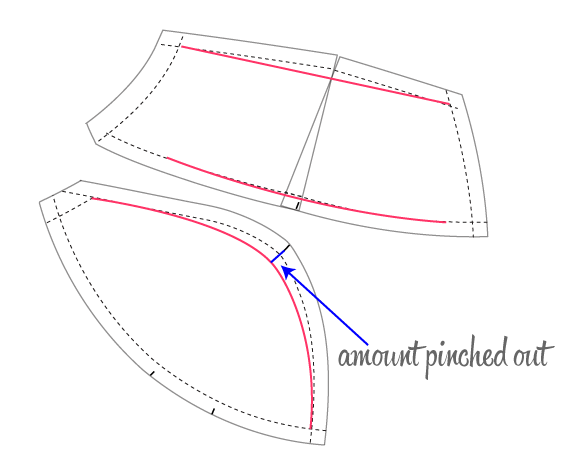
You will have to adjust the length of the uppercup seamline to match the new lower cup seamline. The illustration above shows one way to do that, by cutting and overlapping to shorten the seam.
Smoothing the apex
If the cups are just too (yes I’ll say this!) pointy, you can always smooth out the apex curve of the cup. When doing this adjustment, start small so you don’t remove too much of the seam length. This is pretty similar to doing the above adjustment. Maddie of Madalynne has a great post explaining cup alterations, particularly this one!
Adding Lift
Both of the above adjustments will add some lift to the bra in some way. If everything fits and you still want a bit more lift, you can try flattening the seam of the upper cup. The flatter this seam is, the more lift a bra has. (Balconette bras with 3-piece seaming often have a totally flat upper piece.)
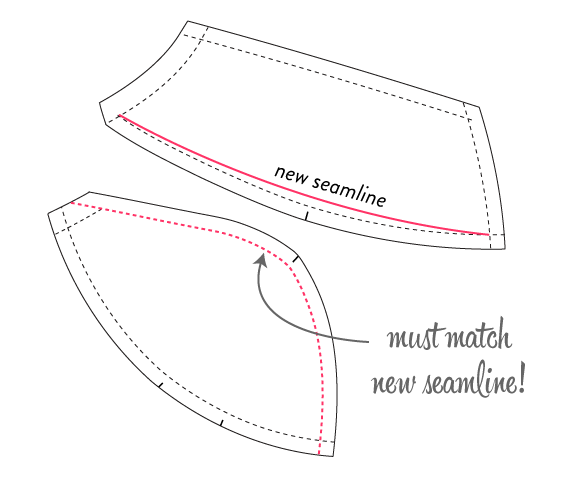
To make this adjustment work, you will have to remove some length on the lower cup seam so that it matches the new upper cup.
Gaping at the Side of the cup
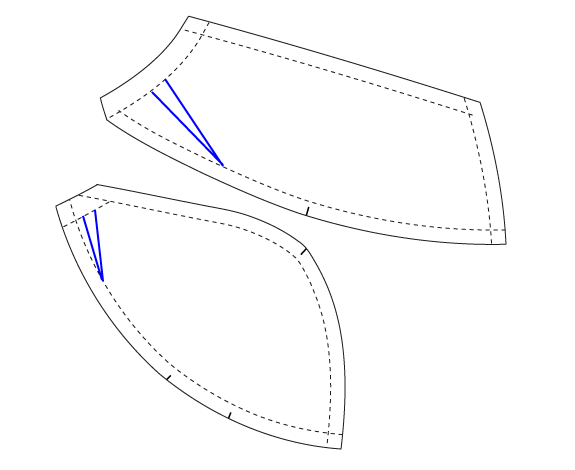
Pin out the excess along various points of the cup to determine where the excess is. Transfer this to your pattern by slashing and closing the darts, as in the examples below.
Adding underarm coverage
This is an alteration I did to my bra. It could help if you want some extra coverage or support along the side of your cup, depending on your figure. This alteration requires both your cradle/band and the cup pieces which run along your underarm.
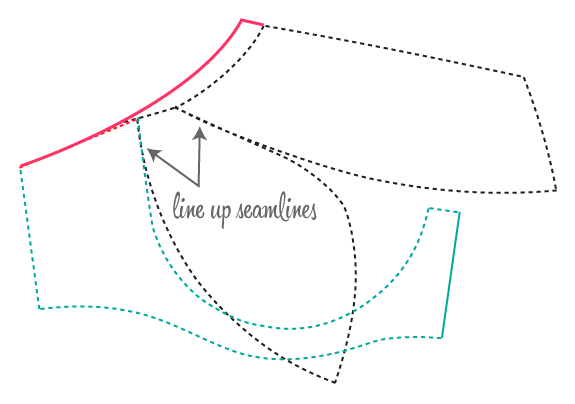
Line up the cup pieces and cradle right along their seamlines.
Draw in the new underarm line starting from the band and going up toward the cup. In this illustration, I’m also making my straps further apart on the top of the cup.
Adding more coverage the top of the cup
If you have more breast tissue at the top of your cup and want more coverage, you can always raise the top seamline. Most of the patterns we are using aren’t entirely a “full cup” bra.
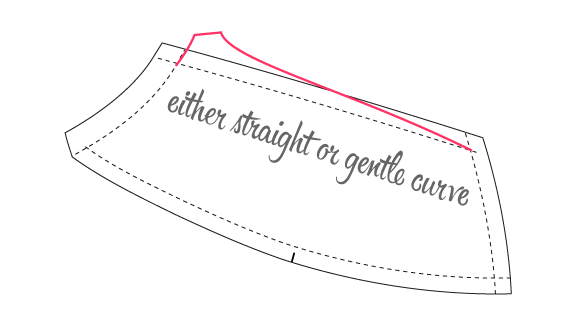
This new line can be either totally straight or just slightly curved–a curved line will add a bit more length.
That’s it–I hope these give y’all some good ideas! Tomorrow I’ll be featuring some of the great fitting questions you had for Norma.
Would you like more fitting tips? Every other week I tackle a bra fit question or alteration in my newsletter, The Lingerie Maker.

Your advice is absolutely top notch Amy!! Your posts are like pure gold to the bra-making enthusiasts amongst us… thank you so much for hosting this brilliant sew-along!!
Thank you so much! So good to hear encouragement. This has been really fun for me!
I am a 44DDD and I can never find good support , or a strapless bra for special occasions are there seamstress who make bras
Very helpful info Amy! I’m about to upload my muslin photos and this post gives me several approaches to refine the fit of the cups. Thanks!
I sooooo badly want to make the bra pictured here! Working on my basic bra tonight using some tricot leftover from my bra making class. My machine keeps pulling the fabric down into the needle hole, grrrrrr! I think I may be using the wrong needle size. Going to pick up some more tomorrow. Anyone else having this issue? I’m really eager to use some non-stretch material for the cups…seems like it would be less finicky.
Isn’t it gorgeous? It’s one of my favorite splurges, and I cloned the bra I could have a pattern from it. It has a lot of unusual construction details.
It stinks when the fabric gets sucked in like that! Sewing tricot can be a total PITA if you have a dull or too-large needle. It’s a knit so try using a ballpoint needle (small like 65 or 70). Sometimes I try sharp/microtex needles that I would use on silk charmeuse (60 or 65). 75 is the biggest I can get away with but it often eats the fabric.
OMG, your posts are priceless! Thanks a lot for your generosity and sharing your knowledge with the sewing community!
Thanks for the shout out Amy! I’m still following along like a madwoman!
Thank you so much for all these diagrams they are really helpful and so well made!
Thanks for this, especially adding lift. I have made myself and DD several bras and have yet to make that connection!
Thank you Amy for your help. This is a really great sewing along !
Thanks Amy! This sew-along has been great. I am still working on my muslin. I tried to make the side band out of the muslin – did not work 🙂 need stretch material. I also tried using an underwire from a previous bra – did not work 🙂 the wrong size. Understanding proper fit has been a real eye opener.
I really need to wait until I receive the rest of my bra making supplies from Sew Sassy, hopefully in a day or two I’ll be able to get back to work.
Hi Allene–thanks! And so true–as with any sewing you really start seeing fit more critically. Keep at it!
Hi Amy. I am looking at your diagram of increasing underarm coverage and thinking it sounds like a good idea. What happens to the underwire channel if you do this? Isn’t there a bit at the top that has no underwire in it that will sort of go floppy or does the elastic sort this out?
Hi Rebecca, good question! In my personal adjustment, I added about 1/2″ starting at the top of the cup tapering to nothing at the top of the band. So in my version I really only ended up with about 3mm more room on the channeling. I try to taper it so that it’s a smooth curve that comes close to the side seam, if that makes sense?
Thank you, thank you, thank you Amy! I employed every single one of your above suggestions to some degree on my second muslin and my fit is sooooo much better. I think just one more tiny tweak and I’ll be there — I absolutely couldn’t have figured it out without your invaluable guidance!
Awesome! Congrats!
I love your insight! I will definately remember this for my next “quick project”. But for my current one, I am making myself a bikini (boobs are too big for string and dont want to spend $80 on a top alone..) and just chopping up an old bra, while covering it with swimsuit fabric. This bra doesnt particularly fit; it doesnt have the thick foam thats molded, just sewn into the cups, and the cup shape is what holds it all.. So when I stretch the fabric the cup caves! Any ideas to make it smooth and avoid caving? I tacked down and around underwire already, so just have to stitch top/straps. I think i might have to stitch horizontally across the cup but you will see that! =\
Hi Shelley, I’m having a hard time visualizing what you’re talking about. Do you mean the cup indents on you? That *might* mean it’s too tight. Stretch fabric can be tricky to fit properly, especially if you’re covering an old bra whose fabric doesn’t stretch. Sorry, wish I could offer more help!
I have a difficult time finding bras that fit. Often wearing cup sizes in the plus sizes to get the band to fit and end up with cups that cover most of my chest and shows over the neckline of my tops. Is there a way to take a full cup down to a demi? Love the tutorials.
Hi Jessica, it’s totally doable! I’ve done this several times myself; all you are changing is the neckline. I had some ideas about changing the style of cups here.
I’ve a problem…
Was trying to gift my girlfriend a surprise, a cute and sexy lingerie… But from a washed bra tag, I saw 36D when it actually was 36B…
I can’t get my money back from the company I bought the bra, nor trade it, since it was a discount and 1 time only deal.
I’ve discovered my mistake re-checking another bra tag, but the mistake was done already! I still want to surprise her and I believe she will be very happy with it…
So my question is: Is there a way to decrease the cup size? Like cutting and stitch the below part or something?
Thank you for your time in this typical dumb fellow :b
– Carlos Estevão from Portugal
Hi Carlos, I don’t know your level of experience in sewing or what type of bra it is, but if the bra has seams in the cup you might be able to take in those seams. It may require unpicking some of the stitches…
Taylor
MIL GRACIAS POR TODO ,QUE EL TODO PODEROSO TE COLME DE BENDICIONES
Amy!
You are a god-send! I’ve just lost 25 kg and gone from a G to a DD and down at least one band size … and I have lots of brand new bras that I bought on sale ….. F + G cups! I’m getting out my test fabric now … and then taking to the still-new-with-tags bras in my drawer!!
Now with confidence …
Thank you!
Helen
Melbourne, Australila
Hi, I am trying out a tutorial I found for drafting a bra pattern. I was wondering, what if you need to lower the seam line to match the bust point? (That is, it fits as for the shape and size and all, but the seam line is above the bust point) That shouldn’t be too hard, right? Just draw the top seam a little lower, and the bottom one to match? I can’t try it right now because I spilled lemon juice on all my little pieces, now they need to be washed first. I am trying to do a 3-piece cup so that it is rounder and fits better.
Yes, that is exactly what you do. I usually only do this in little amounts–like no more than 1/4″, because lowering the seam line and flattening the curve also shortens the width across the cup (the flatter the line the shorter it is). But it sounds like you only need to do it a little bit!
Hi, I am loving your sew along!!! I need to raise the lower cup, right now I got it all to fit right just lower cup is too short barely making it under my nipple. I have implants and the girls are very round. Can you please throw in quick instruction for this alteration? Thanks! It is my live purpose to make this blush bra u have up here! 🙂
Hi Monica, the lower cup needs to be deeper or taller. If you are making a bra with a vertical seam in the lower cup you’ll need to raise this seam by the amount needed, and re-draw the curves. After that, double-check the horizontal seam, and make sure the new curves match the upper cup’s horizontal seam in length.
Hi! I have a question about bra cups alterations. I recently bought a Pin-Up Girl Classic Bra pattern in a 30-38 AAA-D, however I found out that I might be a 30F/FF. I was wondering if there was some way I could make the cup size bigger without having to buy the bigger pattern because I can’t afford to buy the bigger patter right now.
Hi Sarah, I would write or call Bra-makers Supply and see if they have a suggestion for you. I’m sure they get this question often. From looking at the Pin-up pattern, I think the 38D has the same cup volume as their 30F cup pattern. You’d have to shorten the band but you can use one of the 30 band patterns to adjust the location of the side seam and the length of the band.
Hi Amy.
I know this is a late comment, but I had a question on this post. You showed us how to add more coverage to the cup, but how would you take away coverage or make a concaving neckline?
Hi Raisa,
In general, you wouldn’t want a concave line in the neckline of a bra cup pattern. Usually the neckline is a straight line and rarely curved in either direction. (The curvier you make this line, the longer it gets which could add some unforeseen fitting issues.) The only time I ever curve this line–and when I do it is slight–is when I’m adding a strap extension as I did in the coverage illustration. I probably should have demonstrated those two techniques separately so I’m sorry for the confusion. In that illustration I was doing two things—raising the neckline AND adding a strap extension.
If you want less coverage, you typically remove it at the center front, by angling the line further downward. This requires you to cut your wires (or use shorter wires) and also adjust the height of the bridge so that it matches the new lower neck. You can also drop the neckline at the side of the cup although this will create a more squared neckline, and often moves the straps further away from each other. Just some things to think about, but experiment with both and see what you like.
It’s hard to explain this in words but my post illustrating types of cup coverage may get your ideas rolling: https://clothhabit.com/demi-balconette-full-cup/
Hi Amy. I know your area of expertise is bras, but I have a dress fitting question I’m pretty sure you could speak to. I’m making a dress from a friend that has a bodice very much like a bralette: two triangles attached at a straight waistband with the point just below the collar bone. I added a bust dart, made both triangle edges curved, and left the edge attached to the waistband straight. I’m running into problems where the outside edge of both triangles under the arm are gaping and I’m not sure how to solve my problem. I’ve considered both recreating the bodice pieces with princess seams and curving the edge attached to the waistband, but I’m not sure which of these solutions (if either) would solve my problem. Any advice you could offer would be most welcome!
Hi Breanna,
I love helping with fitting! Unfortunately, I’m having a hard time visualizing cups that go all the way down to a waistband. Are you saying that the cups themselves plunge waist-deep? If so, you may have a hard time getting the cups to contour against the body without anchoring them right underneath the bust in some way, or to a back piece, but I might be misunderstanding what you are trying. Pictures help tremendously, so you are welcome to email me here – https://clothhabit.com/contact/ – and we can exchange that way!
Amy