Oh hey, remember my strapless bra project? This week I had a little “me sewing time” after over a month away, and finally worked on finishing it up!
Have you ever used boning in a strapless dress or bra? It’s is one of those little extra things that can add shape and staying up power. A couple of readers have asked me if boning is absolutely necessary and I guess my answer would be—it depends on how serious you are about your bra staying up!
Without bones, a bra slips a bit into “bandeau territory”… the battle of constant pulling up throughout the day. A longer line band helps, as does gripper elastic, but boning is the key to keeping those sides up.
So let’s add some bones…
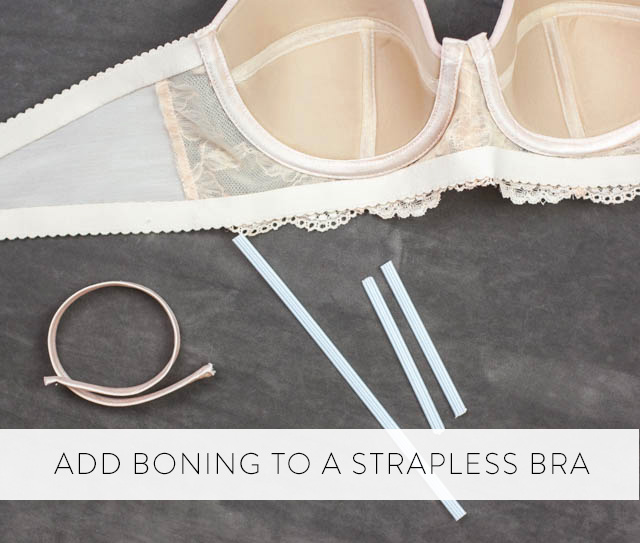
Here’s what you need:
- Plastic bones. I bought plastic boning by the roll at Vogue Fabrics for use in various projects. Corsetmaking Supplies sells smaller sections by the dozen. Google “plastic boning’ and you’ll probably come up with more options, but make sure the boning is 1/4″/6mm. If it’s wider than that you’ll have a hard time fitting it into the channeling.
- Extra underwire casing
I am using my own homemade channeling but any wire casing will do as long as it is wide enough to contain the boning after stitching down the edge of each side.
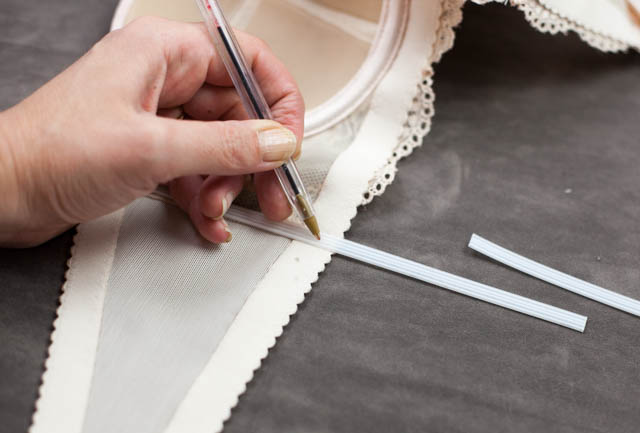
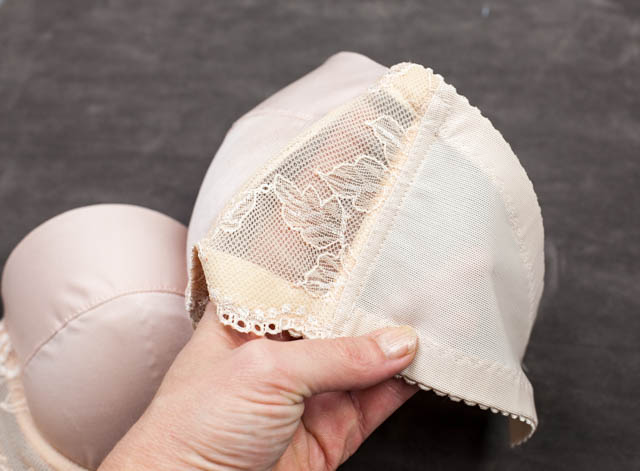
You’ll notice my bra is almost finished. I still have to add the hook & eyes but I wanted to add the boning at the very end so that the bones extended over the elastic and covered most of the side seam.
1. Lay your boning on your the side seams and mark off the length you want. Make sure to leave some room above and below the boning to close the channeling. Then cut.
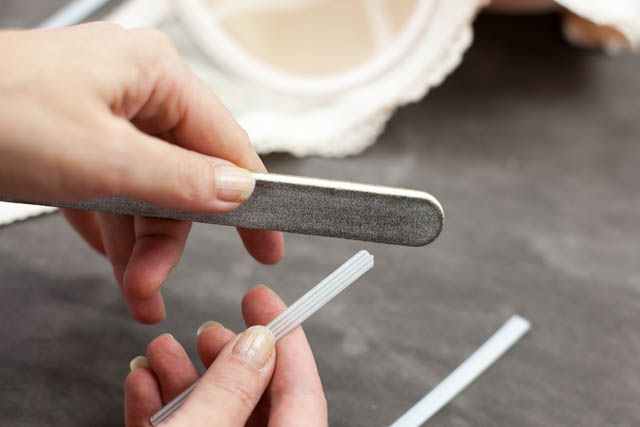
2. Round off the ends of the boning with a nail file. This prevents sharp corners from poking through. You can also use your scissors to created rounded ends on the plastic—easy!
3. Now it’s time to add your channeling. Line up the channeling so that it is centered over your side seam and stitch down each side, leaving the ends open.
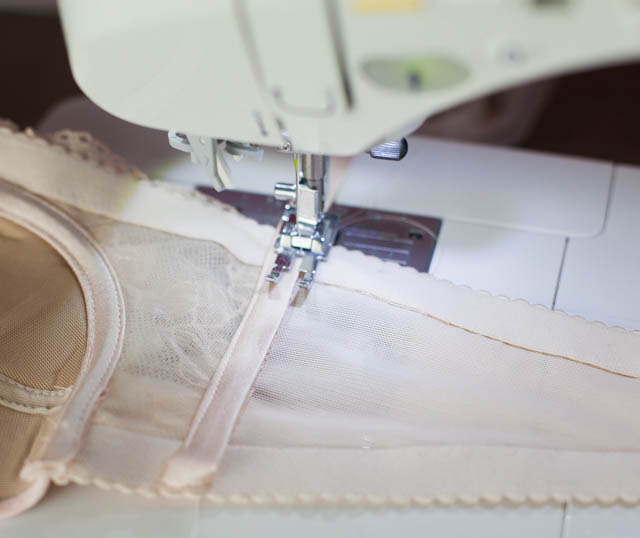
You’ll notice I left a part of the ends unstitched. I did that so I’d have some room to fold under the channeling before closing it off. My homemade channeling is thin enough to do that but most channeling isn’t, so go ahead and stitch all the way down!
4. Insert your bones and test the length. Do you have enough room to close off the channeling with your machinef foot? If not file or cut a bit more off the ends.
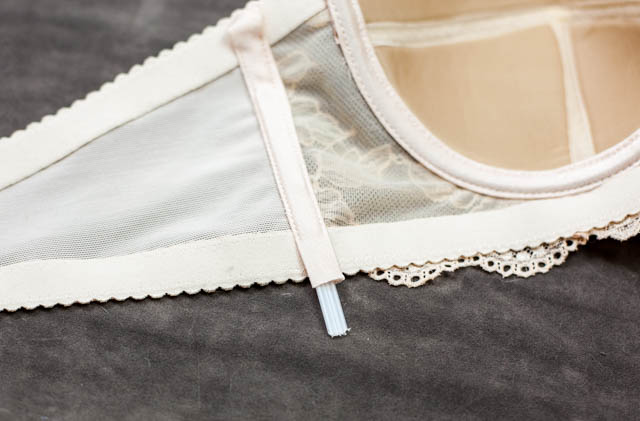
5. Close off the ends. I stitch forward and backward with a small-length straight stitch (between 1 and 1.5). Here’s a close-up…
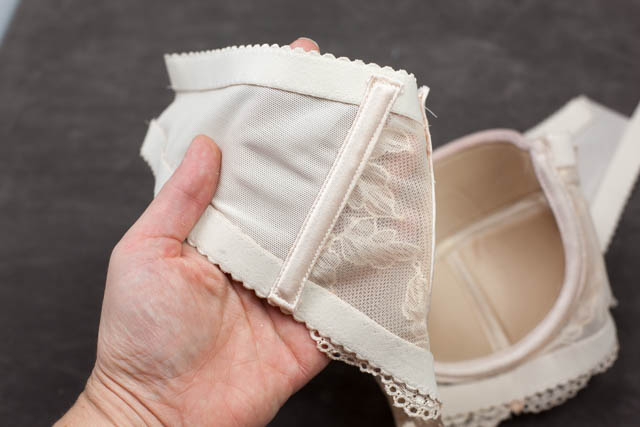
On a side note, I used to try a narrow zig-zag or bartack stitch to close off wire channeling but it is really difficult to do neatly over that many layers with my machine. The straight stitch works just fine.
And from the outside…
That’s it! I promise I’ll be back with some details on the finished bra. I had to make a pair of undies to go with it, of course!
Would you like tips and inspiration in the craft of lingerie sewing? Sign up for my weekly eletter The Lingerie Maker.
Such beautiful work! Thanks for the tute, much appreciated!
you’re welcome!
Thanks for this tutorial, Amy. I usually don’t add boning to the side seams because I don’t need that much support and haven’t had an issue with my bra riding up.
Question – what did you make your channeling out of? I saw on a Free People bra that they were using a heavy-weight knit. Clever, eh? Think about it – it’s very soft against the skin.
Thanks Maddie – I wouldn’t add them to a regular bra but for a strapless it makes a difference for me (after trying it both ways!). Interesting about the knit… as long as the wire didn’t poke anything is game, right? I made this from silk charmeuse. A little luxe touch!
Is the charmeuse cut on the straight of grain? Is it a tube, or more like a single fold bias tape? I have only found the thickest, ugliest fleecy channeling here in NYC so I’d love more details on how you make your own.
Hi Grace, a few readers have asked me about the channeling, and y’all read my mind. I have been working on a tutorial about making your own! (It’s cut on the bias.)
Awesome tip Amy! Thank you! The bra is looking gorgeous…
thanks, Sallie!
You are so inspiring to me and I’m looking forward to making my first bra soon. Please keep the tips coming!
Awesome! I hope you have a great experience…
Hi there–thanks so much for the blog. Everything is so inspiring. I was just wondering how you made your own channeling. I suppose that you just made tubes out of some sort of stretch knit or something? Or, is it a stable tricot or something? Many, many thanks!!
All the best,
Francesca
I just saw your replies to the comments on your post. lol. Beat me to the punch. You just about answered everything. Yay–I’d love to see a tutorial on the channeling.
Thanks so much!!
Francesca
Just, beautiful.
Why plastic boning instead of metal? It seems like corset makers prefer the metal.
Hi Laura, interesting question! I think metal bones would be overkill for a “daily wear” strapless bra for me personally. I guess it would depend on what you want out of of your foundation garments. Corsets and strapless bras are two different things. A corset uses metal boning because it is all about the waist shaping, but a strapless bra isn’t a body-shaper garment. A lot of bustiers and almost all strapless bras in RTW use plastic boning because it’s a little more flexible. It’s pretty versatile stuff!
Your work is absolutely beautiful! Thanks for the clear and helpful explanation. I should try to tackle a strapless bra next! 🙂
Thanks Carolyn!
Hello .. I came across our site a few weeks ago and have been following some of your posts – thoroughly enjoy the lessons!! I do have one question as it relates to not using small zigzag stitches to secure ends in your bra channeling… You indicate that you now only use straight stitches but how do yo manage to prevent fraying ?? I’ve tried that a couple of times and the strap tape or channelling has frayed and I’ve had to re-sew with zigzag.. Can you pls share your secret?? Many thanks…
Hi Cindy, that’s a great question. I haven’t experienced fraying for some reason. I usually use a non-woven channeling, so perhaps that may be part of it?
On underarm side, I close the channeling after folding the elastic over the ends, so the ends are completely hidden. On the center front, I cut the channeling extremely close to the stitches. For the boning in this bra above, I actually folded the channeling under at each end but it was a thin channeling so this didn’t create bulk.
In RTW, all of these areas are closed off with a bartack machine. Whenever I try to do a tiny zig-zag or bartack type of stitch, it rarely looks neat and often ends up tearing the seam allowances of the bra cup. A lot of this has to do with a machine’s feed, and perhaps you may be able to get a better result with these stitches than I do.
Have you ever heard of Fray Check? It’s a really great thing to have for all kinds of sewing purposes. Here’s a link to it. It would definitely keep the ends from fraying.
I’m not really a sewer, but I have been searching for how to add more support to the side panel of my bra. The bras I have fix well (and are side support bras) but I need more support on the side panel under the arm. Can more bones be added to the side to make it more custom for me? I imagine added it to the elastic is difficult.
Hi Kathryn,
You can add as much boning as you want! Hopefully this tutorial gave you a good idea of how to do it. If you are asking if you can put two bones into one channel, that might get very bulky (and uncomfortable), but you could also put two boning channels right next to each other. Wherever you put your boning, it’s okay to sew the channeling right onto the elastic, since you are adding it to an existing bra.
Amy