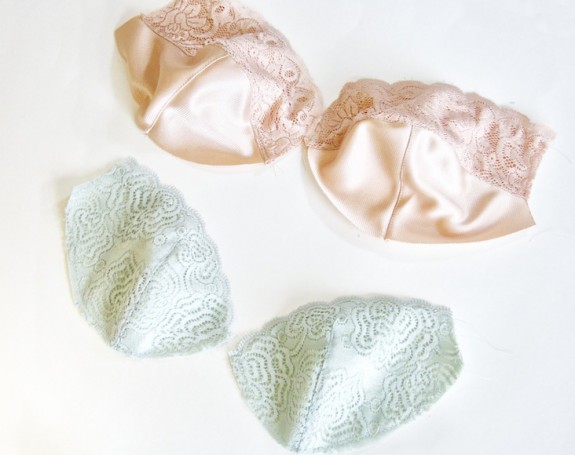
Alrighty, how’s it going y’all? I’d love to hear. I know some are still fitting and some of you have made two or 10 bras by now! Me, I’ve made better friends with my Canon than I ever thought possible…
Before I break out the sewing machine, a couple of things that I’ve been using on my bras.
A straight stitch foot. I use my foot as the seam guide–the distance between the needle and the edge of this foot is exactly 1/4″.
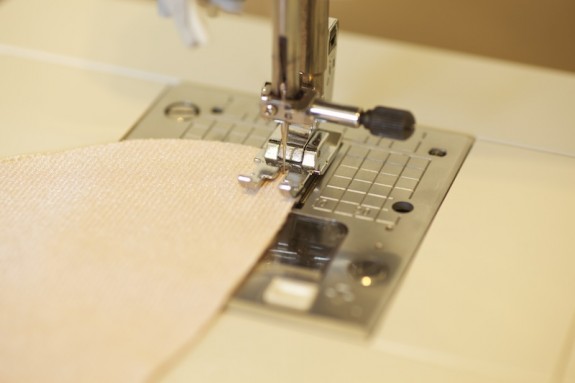
Of course, don’t forget to switch to your zig-zag foot when sewing your elastic. There’s a big Ask How I Know. Which is why I have extra needles…
I use a stretch needle, size 11/75. This has been perfect for elastic and lycra, but also seems to work best on all the tricot-type fabrics. For lace I sometimes go to a very small needle. I’m always experimenting!
assemble the cups
How you proceed on your cups depends on whether you are fully lining your cup, or just lining one part (like the bottom)–or not lining at all.
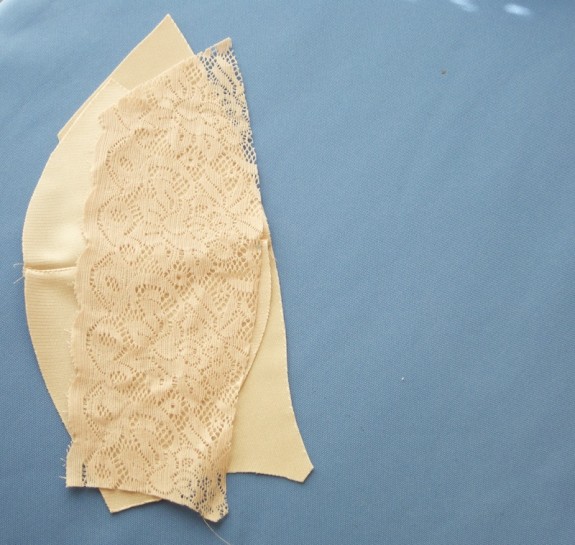
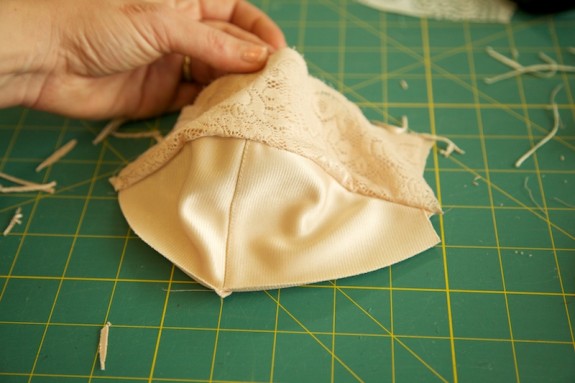
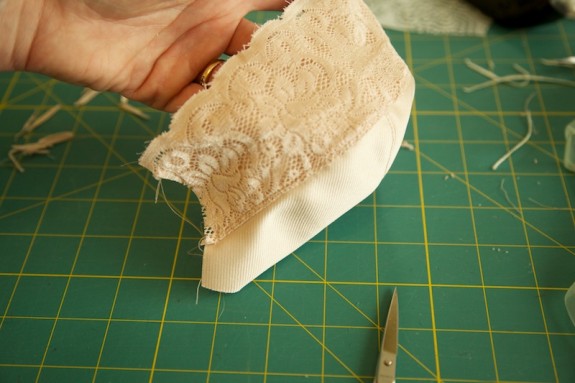
On my friend’s bra, I’m using lace only on the top cup, as an overlay on the regular bra fabric (in this case, simplex from a bra kit). I want the cross cup seam allowances to be totally hidden inside the seam, so I stitched the three layers together with the lower cup sandwiched in between.
“sandwich” turned right side out, before topstitching…
On my bra, the outer cup is entirely lace and the lining is interfaced silk charmeuse, so I constructed the two layers separately:
To flatten the seams, I turned the seam allowances over to one side and edgestitched onto the allowances, just a tiny width away from the seam.
Your pattern may have instructions to press open seams and topstitch on both sides. Or topstitch the seam allowances together to one side. This is really up to your preference and how thick your material is! Most often, I like to edgestitch which flattens the seam enough for me.
So when I was first starting to make bras, I struggled with rippled seams across the cup. Oh the dreaded rippled seam in knits! Since seam rippling is usually caused by one or the other layers stretching too much, here are a few things to try:
- If your machine has this ability, try lightening the foot pressure.
- As you are sewing, try not to pull or stretch the fabric in any way–let your hands simply be a guide.
- Try sewing without pins! When sewing two different curves together, or concave and convex curves, pinning pulls one layer into the direction of the other which can cause the length to stretch. It takes some practice at first, easing off a pin here and there. Eventually I went cold turkey pin-free! Which has improved my curves sewing and feel for fabric handling.
finish the top of cups
At this point I want to finish the top of my cup! If you are sewing a continuous trim that finishes both the cup and bridge, you’ll wait till you’ve sewn your cups into the band.
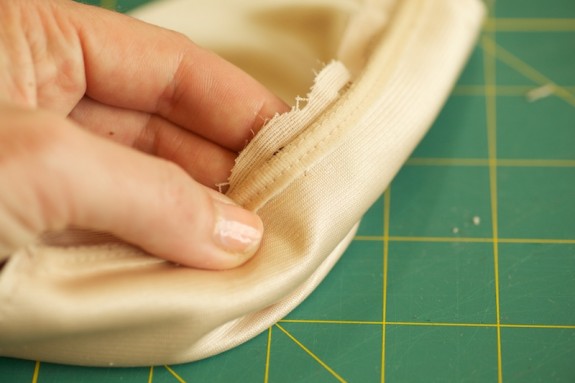
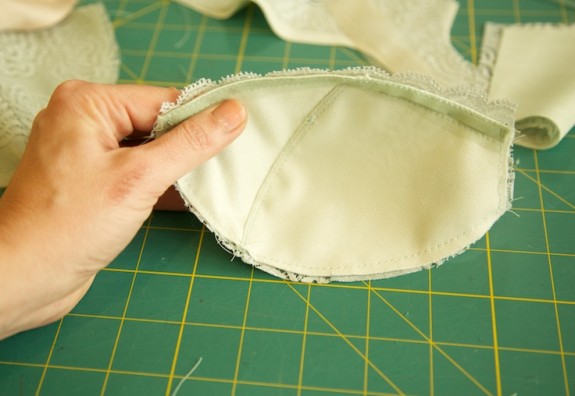
Both of my cups have two layers on top–the scalloped lace and non-stretch lining. To finish the edge of the lining, I tried a technique based on one of my fave strapless bras. I sewed a strip of sheer tricot along the outside top of the cup with a 1/4″ seam allowance.
Then I turned, and top-stitched this down along the inside. I could have done this in reverse, too–which would totally hide the seam. It’s pretty soft as it is. The tricot is cut along the least stretch so it stabilizes things a bit.
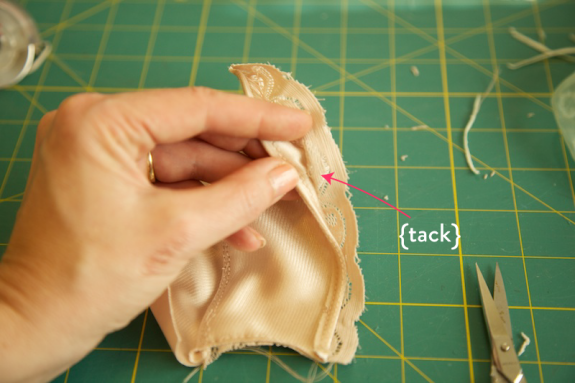
To keep the lace from shifting around on top, I tacked it down in three spots with a small back-and-forth zig zag stitch (almost like a bartack!). I saw this done in an Elle Macpherson bra and liked its invisibility.
Since my bra has a vertical seam, I tacked down the lace to the lining with a couple of straight stitches right at their joining seams.
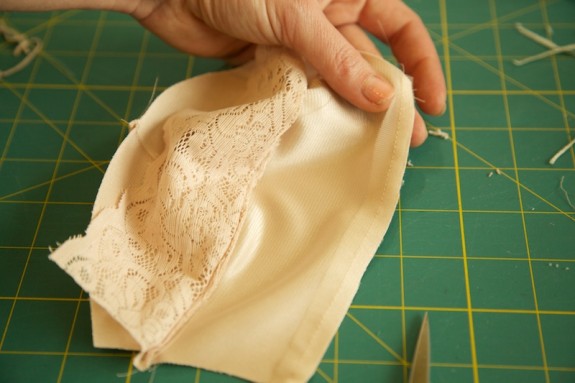
After you’ve finished the top of your cup, you can baste the layers together around remaining edges, so that the cup will be treated like one piece. I do this just inside the seam allowance–it’ll all get hidden underneath channeling and elastic! When basting stretch lace, it sometimes wants to stretch past the lining, as you can see in the above photo. It’s just the nature of stretch–I try to keep the excess toward the bottom of the cup and just trim it off!
other cup finishes
There are loads of different ways to finish the top of your cup! I’m always experimenting.
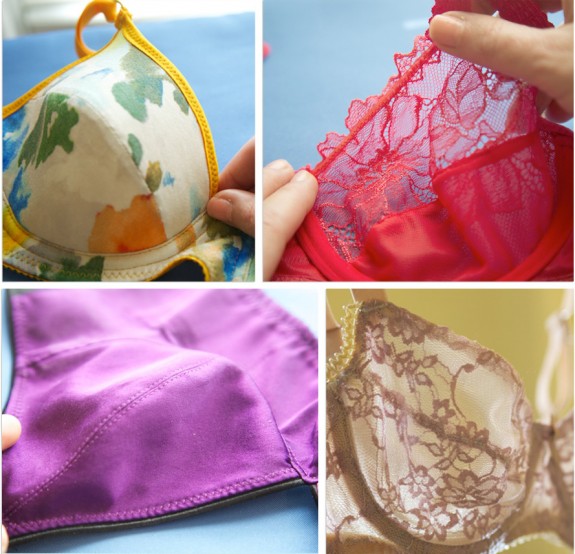
l to r: foldover elastic as a binding, decollete or clear elastic along the bottom of scallops, picot or piping elastic, lace and lining layers sewn right sides together for an invisible finish (which I wrote about here).
Would you like tips and inspiration in the craft of lingerie sewing? Sign up for my weekly eletter The Lingerie Maker.


You are an inspiration to me. I am getting up the courage to try ma,king my own bra. I am nervous about it but I have you for a resource and could always ask for help. Thanks so much for all info the you are sharing.
Thank you Ruth. Please feel free to ask questions or email me when you do–I am happy to help!
I was just reviewing the cup finishes. What size clear elastic did you use? I’ve only seen the 3/8″ available. The finished edge in the picture the elastic appear to be narrower?
Hi Naomi, in that photo of the red bra I was using a decollete elastic from a Merckwaerdigh kit. It’s a 1/8″ soft almost ribbon-like elastic. I’ve never seen this outside of European bra kits but I really like it. I have used clear elastic, too. I have a package of 1/4″ I think I got from Joann’s or somewhere like that. You can cut clear elastic, too! I usually run a rotary cutter over it to get a very small width. It’s a good way to finish off the top of a sheer lace cup and I see that a lot in rtw.
Amy,
Although I’m not participating in the sew-along, I do have a question that’s been I’ve been struggling to answer in my own bra making. Power mesh! If I’m lining both my upper and lower cup with powermesh and want the cross cup seams to be wrong sides together (or clean finished), I would have t sew the lining and self cups separately like you did in this post. What size needle and tension woukd you use? My machine does not like sewing powermesh together and and the seams have been yucky!
Hey girl! I like that kind of lining, too. Hmmm, I have been using a stretch needle on most of the bra, including stretch mesh/powermesh and so far so good. It’s a little bit different than a ballpoint. Is the fabric bunching down into the needle plate, or is the needle not going through the fabric? (Or both?)
One time I had a lot of trouble with needle-eating and I unscrewed my plate–there was a load of lint in there! and little threads. After I cleaned it up that really helped. Or maybe trying a smallish needle like something you’d use on silk. Let me know how it goes!
ahh… maybe it’s the needle. I’ve been using a ballpoint. The needle is going through the fabric but it is bunching in the needle plate as if the fabric doesn’t have enough “substance” to handle the needle (it’s too flimsy) if that makes sense. I will let you know how it goes.
Yeah, I know what you mean. If it’s the sheer tricot, sometimes a little silk needle like 65 helps. It is flimsy. We’re gonna master this stuff, though!
All so pretty! I hope I can get something that looks similar! Very inspiring, Amy.
Thanks for the instructions. It is going to be nice experimenting with the different cup finishes.
Great fabric and lace combinations. Very pretty!
Looking forward to seeing these bras come together.
Thanks Norma! Are you making one, too? I’m so near the finish line.
Still fitting and hope to share the revised version soon, however I am so appreciative of all your detailed posts and information.
I had a look at my Janome Straight Stitch foot and unfortunately that is not 1/4″ so I have been using the Janome 1/4″ seam foot, so far so good.
Thanks Sharon! Today I looked in my manual and my foot is actually called a “patchwork foot” for quilting. I didn’t even know! It just looked like a straight stitch foot… I use it more than any other.
Hi!
I just wanted to say thank you for having made this series. I’m sewing a bra and your series has been very motivating!
Me again!
I have a question this time…I’m a bit confused about finishing the top of the cups…if the purpose is to stabilise the seam then I’m confused as to why elastic is used…surely elastic is stretchy therefore not stabilising??
thank you again for this wonderful resource!
Hi Mia, good question! There are so many ways to finish the top of the cup, and it’s really up to your preference, support or style of bra. Most foam cup bras stretch a bit. Using tiny elastic along the neckline of scalloped lace is common in rtw bras.The elastic does stretch but it also rebounds, and we move around there a bit so it’s ok to have a little movement. It stabilizes by keeping the fabric within the limits of the elastic, sort of like how elastic stabilizes the leg openings of underwear, if that makes sense. But some people like to use a strip of stable tricot or a rigid lace trim along that seam–it’s really up to you!
Thank you Amy! It makes complete sense to me now. I hope one day my bras will look as pretty as the ones you showed!
Hey, I was wondering. I got some stretch lace for the wings because the saleslady said that’s what it was for. Could you give me some tips on cutting and sewing it? Like, do you sew everything minus the elastic with a straight stitch? With all the holes in the lace, does the straight stitch hold everything together efficiently? And when cutting it, should I keep the scalloped edge, and where should it go?
Hi Katie, use the elastic underneath the scallops and with a zig-zag. You need elastic to stabilize the band and keep the firmer stretch. You can put scallops anywhere (bottom of wings or top of wings, bottom of wings and bottom of cradle…) It’s really up to you and takes a bit of pattern puzzle work when cutting so everything lines up.
Thank you for replying so promptly. I also want to know if it will be stable enough to use a straight stitch to sew the (stretch lace) wings to the cups and cradle, and to the closure. I am really new to this, and new to sewing in general, forgive me if I seem a little dumb. Will the stretch lace be firm enough or should I line it with lycra? (Haven’t been able to find any powernet in local stores, and ordering online is out of the question right now.)
Use a straight stitch to sew the cups to the cradle and the band to the cradle. Laces vary widely–they have all different types of stretch and firmness, so I can’t tell you whether or not to line it. I probably would, but would test the stretch of your lace and lycra together and see if that is firm enough. Are you working from a bra pattern? That may help you, because patterns are usually designed for a certain firmness and stretch percent and will usually say what percent they are designed for. So if you substitute a stretch lace, you’ll want to line it in order to bring it closer to the stretch percent of the pattern. Most of the time, stretch lace on its own is too stretchy for a supportive bra band.
I know that may sound complicated but a big part of bra-making is learning how the weight and stretch of fabrics interact with each other so there aren’t black and white answers ;).
Ah, gee, that’s tough… I know nothing about weights or stretch percentages. As I said, I’m new to sewing. I am not using a pattern. Instead I used a link I found to draft a pattern block, then I made adjustments to the cups. (They were kind of pointy.) And I left the bottom half in two pieces to have a vertical seam, and make it rounder. (Here is that link: http://www.foundationsrevealed.com/index-of-articles/bra-making/bra-making-projects/368-soft-bras-part-1) But it doesn’t give any information on fabric choices, except to make the wings out of powernet.
Hi Katie, I see! If you have drafted a pattern from scratch, this kind of knowledge will catch on soon enough. Every fabric is going to stretch differently. Even powernet fabrics have different stretches. Don’t worry about it now, but the lighter and more your fabric stretches, the bigger the band will be. It sounds like you are off to a good start, and have a good idea to line the lace with lycra. If the bra ends up too tight or too loose then you can adjust your pattern the next time. If you get want to explore this further, I definitely recommend learning how to test the stretch percent in fabrics. I also have a tutorial on adjusting a bra band based on stretch percent, if you want to try that out further down the line.
By the way, cups with a single dart often end up pointy, especially above the smallest sizes. It usually works better to turn the dart into a seam that runs through the whole cup. I think the Foundations Revealed articles have tutorials on that.
If you have any more questions, feel free to email me too!
Yes, I noticed that about the darted cup, that’s why I started making the two piece cup instead. (three piece now, since I left the bottom half in two pieces.)
Thank you for the links, I will check them out, and compare my fabrics.
I really want it to work out the first time, though I understand it might take a few tries. My materials are a beige stretch lace for the wings, and a beige lycra which I planned to make the cups out of. Also I have a gold satin which I planned to use as the outer layer on everything minus the wings. (the gold best matched the lace.)
Hi Lady!
I’m new to bra making and was wondering what to look for when purchasing a sewing machine if it will be used specifically to make bras?
Hi Kaitlyn, almost any domestic machine will work and I have made bras on a variety of them! I look for a machine that has good feed, since slippery and stretchy fabrics can be temperamental. The only way to really judge that is to test the fabrics you want to use while shopping. I’d also look for a good range of zig-zag widths and lengths, and a triple zig-zag stitch option. Most modern machines have this.
Hi Amy, I was looking at your explanations about finishing the top of the cup with a sheer tricot strip. I just want to be sure I understood well. Are you simply turning it to the inside with the ¼” stitching line as the pivot and all raw edges (bot edges of the tricot strip and the raw upper cup edge) are aligned next (under) to the topstitching? And if you would turn them the other way (to the outside) it would have been hidden behind the upper cup lining and the lace? Thank you 🙂
Hi Lolie, I had to revisit this because it has been a couple years since I made this one ;).
It looks like I folded the both layers at the stitching line, so both layers (the cup and lining strip) are caught in the topstitching. I think you have it right. And yes, you could do it the opposite way so that it faces the lace. It depends on how you want it to look.
Just to explain… For this particular bra I wanted the lace to “free float” instead of being stitched down on the lace. The latter is more common in bra making but I loved the idea of lace not having any stitching in the front except to tack it down at a couple of spots. I found this idea from an old Elle Macpherson bra, which had the raw edge of the tricot strip on the inside, not facing the lace.
Let me know if I need to clear up anything else!
Thank you very much! It is clear and I think it’s a really nice way to finish the top of the cup, that I’d never seen before. Thank you for your great ideas, and even though you may have written this a few years ago I’m sure I’m not the only one that it might still help! I discovered a new passion (bra-making) a year ago and I’m just devouring anything I can find on the subject!
Amy, this is exactly what I wanted to know now about scalloped egde lace 🙂 You are fab, clear instructions, so much help!