Oh my, is it March already? On my leap year day, I played a bit of hooky and spent a long day sewing, basting, hammering, sewing. The coat is so close and soon, I promise, I will be showing up in it in person!
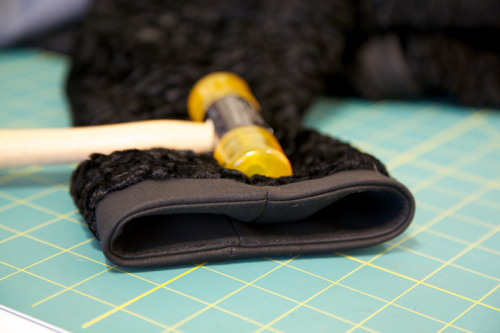
What’s that, hammering? This might be a good time to introduce you to my friend, the mallet. I highly recommend whacking seams with a hard (preferably non-metal) object at some point in your sewing career–it’s therapeutic.
Whacking, smashing, the Jamie Oliver method of sewing. It’s also just about the only way to flatten intersecting leather seams.
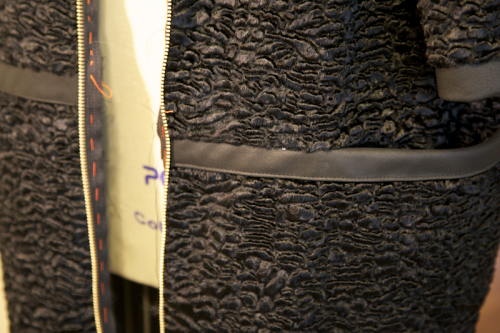
In the end, the leather only occupied such a small fraction of the coat, but made for some very careful and slow sewing. I think I was stitching at snail speed on my machine. The most difficult part was inserting my leather trim neatly around the hip seam.
It’s basically one strip of leather that I pieced together and folded in half. Then I sandwiched it into the hip seam like one would sew piping. The result is a bit bulky especially around the inseam pocket. There was no way I was going to get that folded edge topstitched down neatly without first gluing or tacking it in some way to the fur. Yeah, I had to tape leather to fur. My other newfound friend: Wonder Tape.
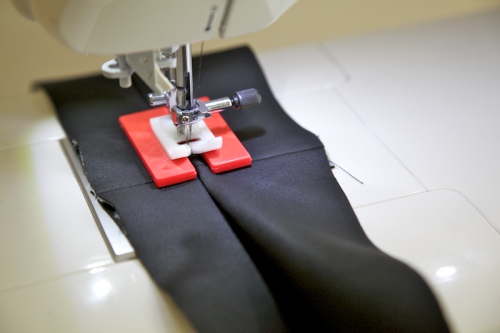
For most of the leather seams, I used a teflon foot, which is the white foot you see below. My machine came with this and I’ve occasionally used it on other fabrics that seem to get pushed a lot by a regular foot. (A roller foot is an alternative.)
And there’s the jean-a-ma-jig tool in action. It’s sort of like a fork you stick under your foot. Understitching intersecting seams was much easier with this! (Another way of doing something like this is to slip a folded piece of cardboard under your foot about a half-inch away from the beginning of the bulky part, and sew “off” the cardboard.)
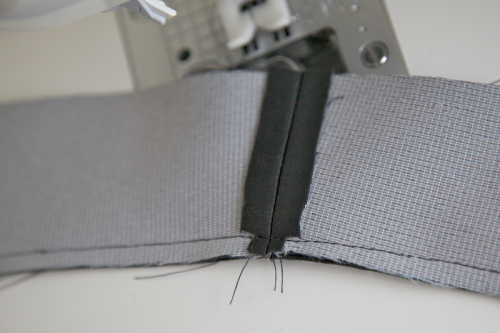
I understitched quite a bit, especially the seams that were going to be edges. On the leather seams that needed to be pressed open, I used double sided fuse tape to permanently hold them down. (Some like to use glue or edge-stitch the SAs down.) These seam allowances are fused-taped and then trimmed near the edges, where there will be an intersecting seam:
On the needle front, I used both leather and microtex needles in size 9, which I had from a previous project. (I found both of these in 20-packs on ebay awhile back.) Both are very sharp and seemed to work well on the lambskin and the fur. Little binder clips are also good to have around, to hold seams together in lieu of pins! I confess I abandoned these because they just kept getting in my way. There were places where I couldn’t baste or pin and I had to hold the layers tight and just pray the fabric didn’t move around too much.
Now back to whacking… just one more hammering session and I’ll be happy enough to sew the lining shut.
Would you like tips and inspiration in the craft of lingerie sewing? Sign up for my weekly eletter The Lingerie Maker.

Oooh, it’s looking so cool! Thanks for sharing the process so much—I love all the little details.
Can’t wait to see how it looks! 😀
This is going to be a very special coat. Can’t wait to see it.
its looking really great – I can’t wait to see it finished, and thanks for the tips on sewing (and hammering! fun!) the leather!
Wow, you are killin’ it! I can’t wait to see your finished coat. This was such an ambitious project, I’m impressed. Good for you!
It’s looking incredible!
You’re such a tease! This looks amazing and I’m dying to see the finished result.
I’m loving your notes on working with these materials. The hammering sounds like even more of an incentive to try sewing with leather.. if my poor machine can handle it (!) Can’t wait to see the finished coat!
I love projects that involve hammers. 🙂 Thanks for sharing your notes, I can’t wait to see it finished.