Do you press seams when making a bra?
I’ve been asked this question a few times. You may be surprised to know that iron pressing isn’t necessary in making bras. The only time I have pressed during the making of a bra is when I have made my own underwire channeling. That’s it!
But wait, you ask, how can you get smooth cup seams without pressing?
It’s easy to get into the habit of treating every seam the same way. After all, home sewing instructions place a lot of emphasis on pressing as the way to a truly flat or smooth seam. It’s the key to a professional look and all. And while that is true for many garments, there are other techniques that often get overlooked as being equally important.
Let me explain. Many home sewing patterns place too little emphasis on understitching and edgestitching. Both of these stitch techniques are common in industrial sewing and important to flat seams.
In bra manufacturing, irons rarely if ever touch a bra. One reason is that most bra materials don’t respond well to pressing. Nylon and polyester knits just don’t hold a crease. (Not to mention it’s easy to melt nylon with your iron if you’re not careful! Ask how I know that one.) Unless you are using a woven fabric from a natural fiber, most bra fabrics will flatten and fold with the aid of *stitching* more than the aid of heat.
Let’s call this “stitch pressing”–pressing with a stitch rather than with an iron.
Edgestitching is a form of topstitching in that it shows on the right side of fabric. Instead of just being decorative, it actually serves to flatten a seam and is done very closely to the seam. To edgestitch, you want to stitch about a needle’s width away from the seam, and catch the seam allowance while doing so. A “needle’s width” is about 1/16” to 1/8” (2-3mm) but no more than that.
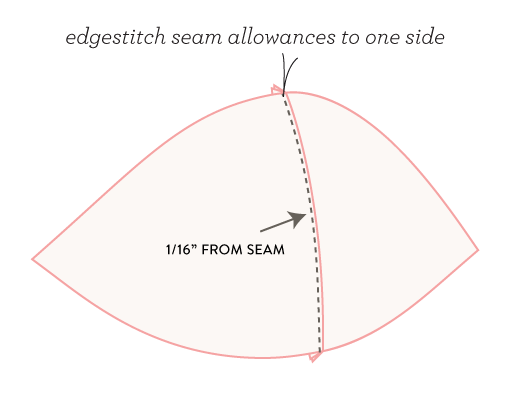
For bra cups with seams, you have two choices:
1. Turn both seam allowances to one side of the bra cup and edgestitch them down on one side of the seam. This is how I usually sew cups made from lightweight bra fabrics and laces.
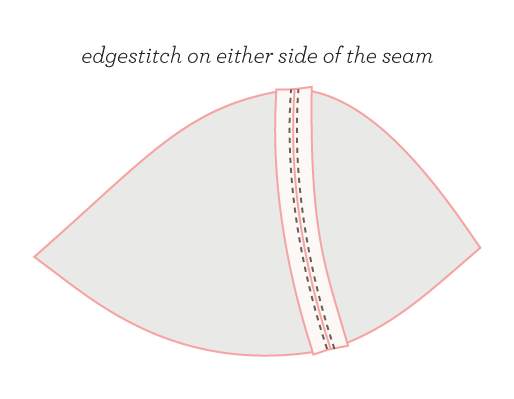
2. Open the seam allowance and edgestitch along each side of the seam. This works well if the bra fabric is denser and the seam needs less bulk. Normally, I edgestitch from the right side of the cup but if the seam allowances won’t stay open I often edgestitch from the wrong side of the bra with the seam allowances facing me. This helps to keep those bulkier seams open and truly flat:
While you are edgestitching, use your hands to flatten the seam as it is going under foot. If you gently push the side that you are edgestitching away from the seam, your seam will be flatter than any amount of pressing would achieve—and will stay that way permanently!
And p.s. A happy happy spring sewing everyone! I’ve been gardening more than sewing the last couple of weeks but who can resist roses!
Would you like tips and inspiration in the craft of lingerie sewing? Sign up for my weekly eletter The Lingerie Maker.
Great little tip! I had basically been using the method without really thinking about it, I guess it was suggested for the cup seams in the Marlborough bra so I just went with it. I wonder if this is why I find bra sewing so fun? No breaks for pressing!
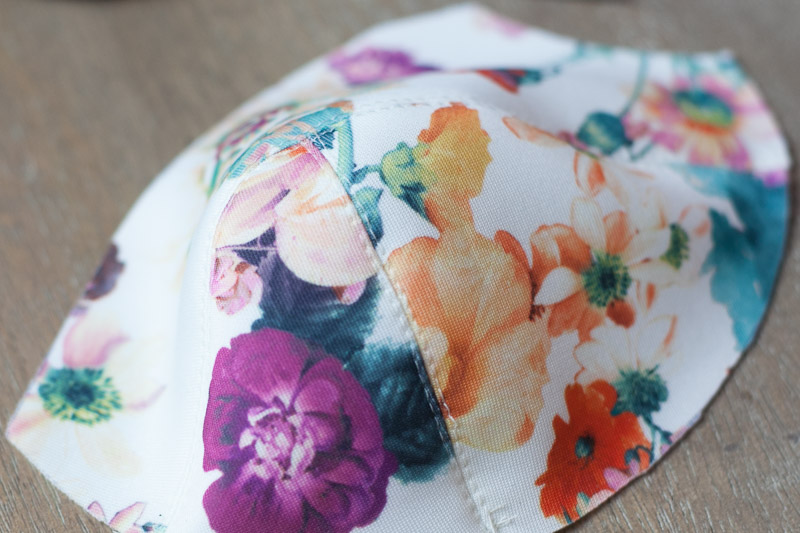
“Let’s call this “stitch pressing””…………..I like that, it makes so much sense 🙂 Loving the floral bra cup fabric.
Happy spring to you as well! Can you send some of that warm weather to Philadelphia. It was in the 40s today!
I use and agree with your techniques above, but I use an iron as an added pressing tool. We’ve had this conversation before! LOL. In my experience, it’s a finishing touch. I put it on the synthetic setting and barely touch the plate to the fabric. I also use the steam blocking technique to eliminate any waviness, which usually occurs after the second pass of elastic on a curve. An example of this was on the neckline of this bra – http://www.madalynne.com/nina-warner – after sewing the elastic down a second time, the neck was slightly stretched out. And it wasn’t a case of elastic fatigue or poor quality elastic. Approximately 10 second after putting it under steam and it was laying flat!
Great post, Amy!
Amy, I too know about scorching my precious bra-making material. It’s a terrible moment! I love your post and that floral fabric is adorable!
This is so true and it takes a while to learn about given the emphasis on pressing. I’m not anti-pressing but for any items which will be topstitched even if the fabric does take a press well, I prefer the look of the finger/machine opened seam to the flat pressed. I feel it often has a softer fold and gives a better line for the stitching to follow. So I do almost no pressing on denim, (except hems). Same for under stitching, I find it gives a much better look than attempting to press the seam allowances. Obviously there are times it’s just not possible but for most my sewing it’s a go to technique.
Jennifer, so true. I made one pair of jeans on which I only pressed the hem! After all the topstitching and edgestitching those seams were as flat as they were going to get!
I have often noticed in sewing other garments that when I press before topstitching next to a seam, especially if the seam allowances are both going to one side, it leaves a little “lip” on the edge of the seam. If I edgestitch or understitch *first*, the lip is gone. Afterward I can press away if I need to.
So glad you posted this! I never press bras with an iron either.
This is an interesting post! Sewing the first bras, I had always the problem that topstitching the cupseams would tighten the seams so they would pucker. So I did no longer topstitch them although I like the look of the topstitch! What am I doing wrong?
SaSa
Hi Sasa, I don’t know if I can answer without seeing the results you are getting but it could be a few things. Perhaps your stitch tension is too tight? Try loosening the bobbin or needle tension on your machine and test by making stitches on a couple layers of scrap fabric. And have you tried doing the topstitching very close to the seam (2mm?). Also you can try a longer stitch–maybe 3-4mm and see what happens.
Thank you, Amy! I did my topstitching very close to the seam. I will try loosening the tension. SaSa
Great article. I had to loosen my tension to get a nice looking top stitched seam. Love the white bra with the dart. Will you be doing a tutorial on putting in a dart rather than a seam?
Glad you figured out the tension issue. I hadn’t planned on a tutorial for a darted cup but it’s a good suggestion!
Thank you for this post! I don’t iron when I sew my bras and I felt so naughty because, like you said, in home sewing pressing instilled in our brains from the get go. I don’t feel as naughty anymore!
It’s one of the nice things of sewing lingerie: no need for pressing. Adorable fabric in your photo!
Thanks Sigrid! I have been wearing this floral bra a lot this spring ;).
Do you have any info about how to make your own wire channeling?
No, but I have been working on a how-to this month. Stay tuned!
I absolutely hadn’t thought of topstitching in this way before. Makes total sense though!!
I have never tried making my own bra, maybe with the guidance from your blog posts i will give it a try.
I hadn’t thought about stitching as pressing before but of course, it does the same thing doesn’t it? And to your point, MUCH more effectively than an iron on synthetic fabrics 🙂
Loved your post, very informative!
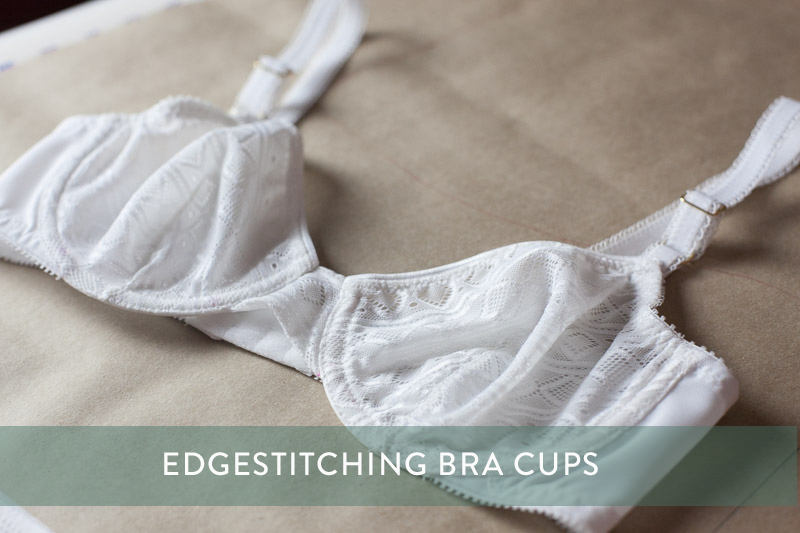
Hi Love your post so helpful. The bra in the picture is it the kwik sew pattern?
Hi Kim, thanks! The bra is not from a commercial pattern. I drafted it for myself. 😉
Hi
Have you done a post on making your own chanelling? I’ve searched the site but couldn’t find anything.
Hi Amy, your sew-along series is very instructional and awesome. Appreciate the professional quality blog too. I m a beginner in sewing. If you permit me, can i ask a very fundamental question. I m bit confused about various terminologies for almost same product like bra, bralette, lingerie, bikini, corset, etc. can you please help clear the clutter. Many thanks, Ganesh