Happy weekend all. Let’s talk fitting alterations! I had planned to do just one post on these Friday, but decided it’d better to divide it into two–one for the band and one for cups.
I know that fitting isn’t always the fun part. And especially on something which we may have had trouble fitting in the past and has so much potential to hold our body image captive! But you can get there. Don’t be afraid to slash into your pattern and make little changes with each new bra, even if it’s something you’ve never seen done before. Your instincts are often better than you think!
In fitting your bra, try to pay attention to the fit of your underwire and band first and the cups second. Many problems can be solved by getting the right “frame”.
Adjusting band length
If you band feels too loose or tight, it’s easy to adjust the length. It should fit well on the loosest or at most 2nd hook. The hooks are there for you to adjust your band as the elastic starts to age. And it will age!
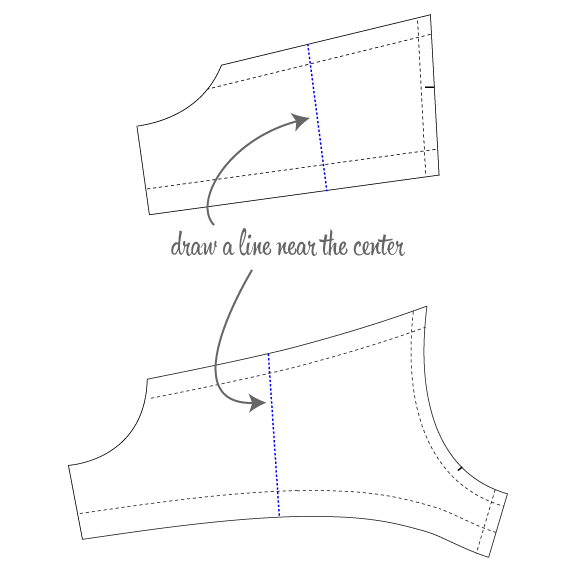
1. Draw a line down the center of the band.
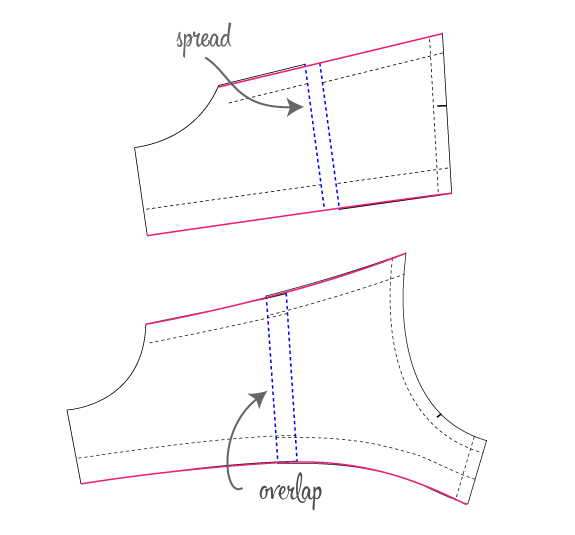
2. Cut the pattern along this line and spread or overlap by the amount you wish to take out. (Remember this amount will be doubled in your bra.)
3. Trace and redraw the new band line making a smooth line connecting the pieces (red).
For a band that hikes up
If your band is hiking up, it may be too long so you can try the above adjustment. But sometimes shortening the band isn’t enough to keep it from hiking up. Perhaps your ribcage is narrower below the bust so you need less length along the bottom hem. And every pattern has a different band angle–experiment to find one that works with your body. This is also called a “downward hike adjustment”.
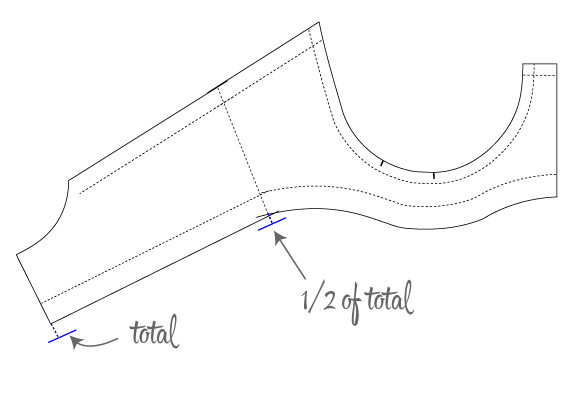
1. If you have a side seam, line up the cradle and the band along the seamline. If your pattern doesn’t have a side seam, draw a line about 2/3 up from the CB to the cup seam.
2. Extend the center back line down by the amount you wish your band to go and place a mark (blue). Extend the side seam line by 1/2 that amount and mark.
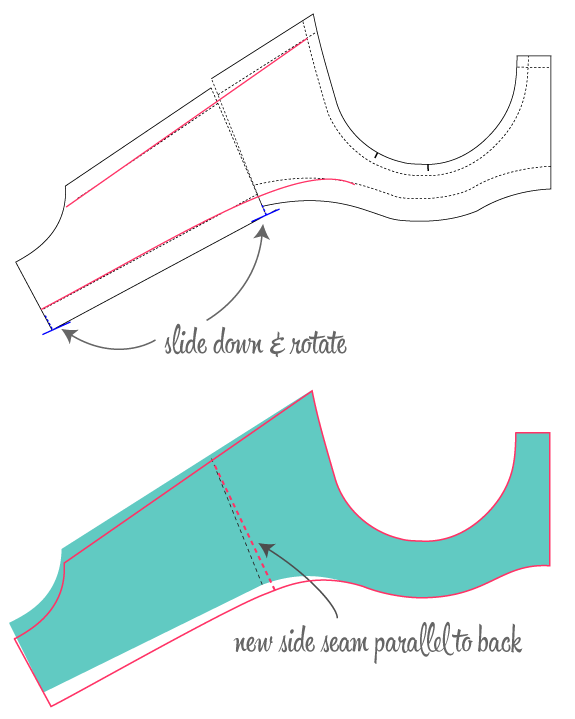
3. Slide down and rotate the back band to meet these new points. If you did not have a side seam, you’ll have to slash the pattern along the dotted line. Retrace your new band line (in red, along the seamlines). Don’t forget to add back your seam allowances!
Gaping along the underarm
This is almost the opposite of the above alteration. On my bras, I often had gaping running from the underarm of the cup around the side seam, usually right where the channeling was topstitched down to the band. I finally figured out that this had to do with excess length along the top of the band. The band plays a role in giving some tension to the underwire, but since I had too much length, the excess was crowding at the point of least resistance right inside the cup.
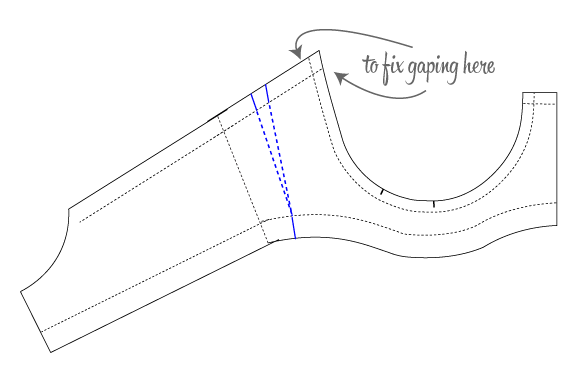
1. Measure out the amount needed to take out the gaping and draw in dart along the front of the band at the seamlines (blue lines).
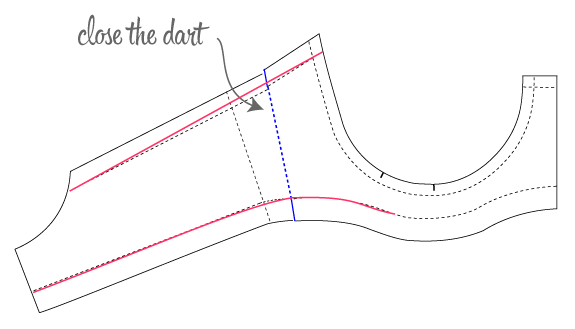
2. Cut the pattern along the blue lines and close the dart. 2. Re-trace the pattern and draw in a new smooth line (red) connecting the pieces.
Note that if you have a lot of gaping at your underarm, you may need a cup adjustment. Gaping problems won’t be solved by pulling elastic tighter around the cup. I tested out this theory on several bras: the ones in which I pulled elastic tighter actually resulted in more gaping. Pulling elastic tighter while sewing ends up removing more of the elastic tension permanently so it stops behaving as it should.
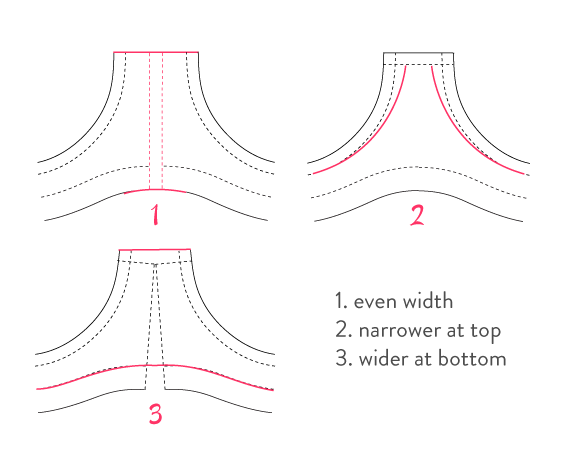
Bridge adjustments
This little space can take a lot of different shapes! If you find it feels a little tight or loose, but your underwires and cups fit you correctly, try making some adjustments to the bridge. Tiny adjustments, like 1/16″ (1.5mm), can make a difference. Remember that whatever adjustment you make to half the pattern will be doubled.
These are just a few alterations I have experience with but hopefully they give you some ideas! Some great fitting questions have come up in the Flickr group. Thank you all, for being brave to share what you’re working on, and please be free help each other out because we all have different experiences. I’ve also posted some pictures of my tester bras so you can see the gory details. I’ve got a few adjustments to make myself!
Further fitting resources:
Bra-makers Manuals, Volumes 1 and 2. Both are available from Bra-makers Supply and Elingeria in book and CD form. These books explore every corner of custom bra fitting and construction. I love collecting bra-making books–particularly drafting books, which help me understand the theory–but these are really the only ones (I know of) that cover fitting to individual shapes.
If you know of other bra-fitting resources, please share in the comments!
Would you like more fitting tips? Every other week I tackle a bra fit question or alteration in my newsletter, The Lingerie Maker.
Bra fitting resources: I’ve posted Lingerie Patternmaking and Grading Simplified By Jack Kirschner here. The grading part is quite helpful for adjusting between sizes.
Thank you for sharing this resource here as well.
Thanks! Ah the vintage lingerie books…. such a treat.
Hello
Thank you for your wonderful posts. However, I cannot find a way of accessing “Lingerie Patternmaking and Grading Simplified By Jack Kirschner” by clicking on your link. It just takes me to a page featuring the book cover and your explanation of copyright issues – or the lack of them in this instance.
Please would you kindly direct me so that I can access the book.
Thank you!
Hi Naoko, you may want to ask directly in the comments on the blog about the book. The person who left the above comment and her post about the book are a separate blog from mine. Amy (Cloth Habit)
Hi Amy,
I would like to have access to the flickr group. I’m following the sewalong.
Thanks! 🙂
Thanks for all the wonderful information Amy, I feel like I am doing an engineer degree, I am getting there! I should post photos of tester bra 2 soon.
Gosh, this is so informative! Thanks for sharing! I’m definitely bookmarking for when I have time to sew a bra.
http://www.breakoutbras.com/sizing
This is an excellent visual guide on how to troubleshoot fit issues for commercially purchased bras, but since we’re all shaped differently, alterations to the bra pattern is probably going to be needed in the majority of women, this will help troubleshoot fit issues and can help women determine what alterations are needed.
I bought my Bra-makers manuals here. The shipping is reasonable if you live in the US.
Cool! I wish I would’ve seen this a year ago. Thanks for the link!
The toile bra is finished. Cool and very handy to show that the band needs adjusting and possibly the bridge cause the casing for the wire is nearly overlapping. At this time, there won’t be any special styling additions to my pattern. But, thank you, Amy, for all the ideas and possibilities for future bras.
I didn’t participate in the original sew along, but I’ve been studying your tutorials as I’ve been working on the Pin up Classic & Shelley. I didn’t think the classic had enough support (made from woven fabric aside from the back band from power mesh). I wore the Shelley yesterday and the band kept rolling up. Otherwise, the fit was great. I’m considering either making a partial band or a long line. What is your thought? Thanks for all of the helpful posts!