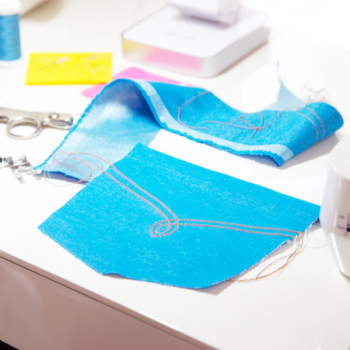
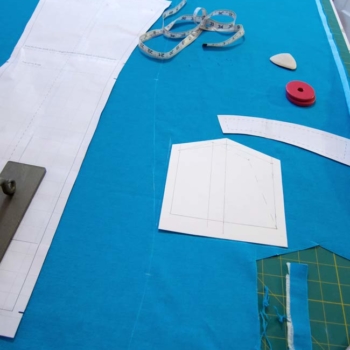
Archive | Patternmaking RSS feed for this section

A Vintage Mood Silk Bra

Just when I thought I was done with purple silk, I was inspired to scour through the scraps for a new project. I try not to keep saving miniscule remnants of fabric but they keep piling up and now I have yet another reason than “oh, this one-inch selvage might make a cool bow thingy some day”: bras!

This is a little project I’ve been refining in bits and pieces over the last few months. Since the spring I’ve been filling a notebook with little lingerie design ideas and sort of immersed in learning whatever I can about bra construction and design. I’ve gone crazy thinking about bra patterns! I sometimes fall asleep thinking about them, thinking in abstract shapes. I’d hoped to test this particular design in a stretch silk so the charmeuse from my shorts was absolutely perfect. It all came together because I happened to have the right notions and elastic stashed for a future project. I love it when a plan comes together.

Shall I do a bit of show and tell?

(I wish I could give you a better view of the back, but my dress form is like two sizes bigger than moi.)

Fabric: “Majesty Purple” stretch silk charmeuse from Mood Fabrics, nylon/lycra (“lingerie lycra”) from e-lingeria for the band.

Notions: metal rings/sliders and picot elastic from e-lingeria, closure and piping elastic (I love this!) from Sew Sassy.

This bra started with me having a bit of an crush on vintage-inspired longline bras, and particularly these soft longlines from Fortnight Lingerie. Back when they had a shop on Etsy last fall, I almost almost ordered one but was far too taken with the idea of drafting something like it myself. My first challenge was to draft a vertically-seamed cup on which I could build other patterns. I really this kind of seaming but it seems difficult to find in bra and bustier sewing patterns.

From there I came up with soft triangle-cup bra that plunges at the center front. Because it doesn’t have a bridge, underwires won’t work in this kind of style but it surprisingly holds its shape without them. (And it doesn’t really need them either with such a supportive band.) You can see I also split the front band because I didn’t have enough fabric for a single piece, but I think this adds a nice visual line with the cups. And just in case you’re wondering, do silk and bras mix? I think so. I have a couple of silk bras, one with quite a bit of structure and and underwired soft bra, and they wear and wash very well. I’ve fused my silk with a soft interfacing both to keep shape, reduce some of the stretch and also make an extra little layer of smoothness.

I’m so excited to have gotten this far on a bra design. I made my first sample out of non-stretch Duoplex and powernet, then adjusted the pattern to work with a stretch woven like silk, and I have another pattern which I’ve adjusted even further to make the cups and front band from a nylon/lycra jersey much like the Fortnight bra. That means 3 separate cup patterns! The more the stretch, the more the cup needs to be reduced in some way. (You would think I could apply that understanding to my other projects.)

Just for kicks, while I had all the remnants out, I tried out the OhLuLu Betty pattern for matching knickers, which I won back in May from A Good Wardrobe. They’ll need a bit of work to fit properly and I already had to chop off two inches so they didn’t reach up to my bra band, but I’m still deciding if I can do this style. It’d be more tempting if it had some mystery svelt-ing material to hold in my figure. I can just hear Bridget Jones: However, chances of reaching crucial moment greatly increased by wearing these… scary-stomach-holding-in panties very popular with grannies the world over… tricky… very tricky…

· Comments { 28 }

Muslins & Yoke Pockets

It has been a wonderfully on-and-off overcast week here in Austin. I’m pretending it’s raining more than it really is and that I should be having an “inside” day. Which means sewing and lots of pattern-cutting. And blogging. And playing with new tech toys…

My silk shorts pattern is finished and I’ve decided to sew a couple of pairs at the same time. I love a little assembly-line sewing! Until I get them done, I thought I’d share a few things I learned along the way… Today is all about yoke pockets. Over the last year I’ve made several patterns that have had some form of hip yoke pocket. The Lonsdale, the Cambie dress and my shorts all have these pockets. And of course you’d be familiar with them from many trouser and most jeans patterns.

The top pocket is a pretty common Burda pocket in anything with a fly. In Burda patterns, there is often just one piece on the pattern sheet. You’d trace off two separate pieces from that–one for the yoke piece and one for the lining that sews into the front skirt or pant piece. (The little extension is sewn into the center front.) The example on the bottom is a folded yoke pocket that includes lining and pocket in one.

It seemed a bit laborious to sew entire pockets into the muslins of these patterns, but I did–four times! Now I’m guessing I may not be as clever as my readers, but I really didn’t think of a way around this till I started making several test runs of my silk shorts. To cut the pocket and front as one for a muslin, I lined up the yoke pocket piece with the side seams, making sure the grain lines of pocket and short fronts were parallel. The patterns with these pockets often have notches near the hipline and along the waistline where the pocket lines up, which helps lining them up.

When cutting them out, I kept weights on them to make sure they didn’t shift.

Once lined up and taped/weighted onto that front piece, I could draw in the hip shape, remove the pocket and then proceed to cut the front as one whole piece.

What I really want is a flexible shorts block that I can use for multiple styles. So after finally getting the fit I wanted, I ended up making two blocks, one for shorts with pockets and one without. Now I have possibilities for side zips!

If you’ve ever made something with these kind of pockets, you have probably noticed they pull and bulge a bit if there is not enough hip room. Sometimes bulging–or a draped pocket–is intentional, but the pocket and short/skirt front have to be cut that way. Once I did a muslin without pockets I got a much more accurate fit without depending on the ease of the pocket “give”.

Hmmm, now I might be playing around some cool draped pockets like these Philip Lim trousers…

p.s. Sorry all if you wanted or tried to comment on my last post. My offline blog writer played a tricksy on me. All should be working now!

· Comments { 8 }

If It Weren’t for the Skeeters

{update: Oops, I didn’t realize comments on this post were disabled. I had a conflict with one of my plugins. All is working now!}

I’ll go for months and months without shopping and then suddenly I get a get a bee in my bonnet to make a whole day of it. I rarely drive anywhere–most of my week happens within a five-block radius–but I love my car so it gives me an excuse to tool around town in my Ladybug.

A shopping day starts with a latte from my favorite coffee shop and then I visit a few local boutiques. There’s always a stop at Anthropologie, and mostly I just drool over their furniture and all the little knick-knack housewares. Sometimes I’ll cruise as far as the mall to check out lingerie sales at Nordstrom. But I really love small boutiques that have their own creative voice, that operate more like galleries rather than try to serve everyone at once. Kick Pleat is one of those shops, with a tightly edited, small collection of designers, mostly independent European brands you wouldn’t find elsewhere in Austin.

Two of my absolute musts for the summer were a blouse-y white tee shirt and silk shorts. I really thought I’d get around to making a tee by now, so I couldn’t resist this floaty white tee which has that right amount of haphazard slouch I like to throw on with everything.

{I’m a sucker for lady sandals, especially ones with bizarre slug ornaments…}

If it weren’t for the mean skeeters, I’d probably wear something short every day. I had a few pairs I planned to make this summer, including a remake of my pretty purple silk charmeuse shorts. They were one of those projects on which I spent more time working out the finishing techniques than fitting them properly and I accidentally cut the wrong size (down). I mocked up the next size up only to realize that the pattern is better suited for a more structured fabric than charmeuse. The original pattern was in the Burda June 2010 issue and is a sweet little short pattern, but has a bit of tailored fit and not quite the drapey loose-fitting style suited to something like charmeuse. (There were two looks in the magazine, which are both available at BurdaStyle here and here.)

My sewing hours the last week have been spent working out a new pattern, but keeping all the trouser-y details. A contour waistband, fly, options for cuffs and welts are all unexpected touches in silk, dontcha think? I’m working out sample #3 and I think I’ve got the pant leg just right. It’s almost a different pattern entirely and sometimes I wonder why I just don’t have a trouser block to begin with!

A few of my inspiration shorts:

{Credits: Shopbop, ForwardForward, Ralph Lauren}

· Comments { 3 }

One in Every Color

Do you have a signature pair of sneakers? These are mine, in my favorite summer color of the moment, a cooling mint–like a mojito on my feet.

I tend to find a classic and stick with it. For years I loved Chucks, then classic Vans. Then I discovered Superga. They are Supercomfortable and seem to last longer than Vans. Unfortunately, all of my sneaks eventually get holes and turn into muddy-colored garden shoes. Derek and I once considered making a wall sculpture out of our dead but sentimental shoes from the past, but quickly realized it’d be a rather stinky sculpture…

So sneakers and tanks are the mode du jour. We are officially in the dog days of summer. The 100s have arrived, and just like last summer I have realized my wardrobe doesn’t have enough floaty, breezy tanks. So over the last couple of weeks I’ve been refining a tank pattern I started in on last summer. I’m determined to have one in every color!

These are a few samples from leftover yardage. Each one is from a different knit (modal/lycra, rayon/lycra, and an organic cotton jersey). I was trying to learn a bit about fabric fit and behavior, particularly with bindings.

One of my favorite tank shapes is a loose sort of a-line fit with a deep u-neck and a slight racer back. My first version (not pictured) looked more or less like a sleeveless tee with a slightly tented hemline. On the next three I added a shirttail hem and kept scooping the neckline and armhole a little bit more each time. It’s super easy to draft a tank from your favorite tee pattern and it’s only taken a few experiments to get the right scoop shapes to my tank. If you need a book to guide you, I really like Built by Wendy’s Home Stretch, a good beginner’s guide to sewing with knits. It includes a few starting patterns, like a tee, and walks through modifying a basic tee pattern into other shapes. Although I’ve never used the book’s patterns, it gave me some starter drafting ideas when I first started playing with my tee shirt pattern (BurdaStyle’s Lydia) a couple years ago.

I think I’d like deeper armhole scoops for future versions. I was being a bit conservative at first, worried I might reveal too much. You can see that the white tank looks a little tighter around the bustline. When I first drafted this pattern off my tee, I narrowed the bustline to account for stretch. The stripey modal fabric stretched over 100% and fit just perfectly. Even though the white knit is about t-shirt weight, it’s quite stable and stretches only about 20%, so I’ll probably need a second pattern adjusted to fit stabler knits.

It’s good to know the stretch percent of knits particularly when it comes to bindings. The more elastic the fabric, the shorter the binding needs to be. I experimented on scraps before binding each tank to get the right reduction for a flat, clean look. So, for example, on the striped fabric, I narrowed the binding length by 30% and for the cotton knit by 10%. Too long bindings cause all that ugly rippling and the binding to stand away, while too short bindings gather too much and pull in and up.

My favorite edge finish is a sewn-on band using this method, which I’ve been doing for most of my tees the last couple of years. I start out by basting the folded binding to the seam (right sides together), then I serge over the basting, then I fold the binding out and topstitch the seam allowance down from the front to keep the seam flat. I see a lot of store-bought tees with this sort of binding, in which the seam isn’t actually “bound”.

For actual bindings that enclose the seam, I think it’s difficult to get a clean, consistent look unless a binder is involved. And I actually have a couple of binding attachments for my old Bernina, but still need to do some experimenting to get them right on knits. For some tanks I’d love to have a little baby binding with just a single stitch on top (rather than twin needle or coverstitch) for a more elegant look. For the white cotton version, I knew the fabric was a bit more stable and would take better to this kind of single fold binding so I tried a method Sherry described on her blog. It came out very clean and pretty!

Stay cool everyone! Now back to that glass of lemonade…

· Comments { 13 }