Archive | February, 2012

Just a Few Smashes Left

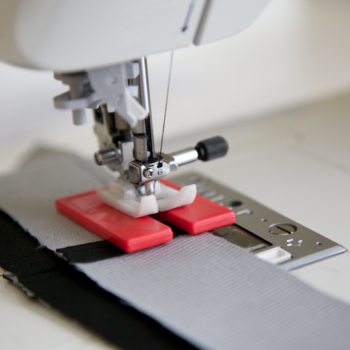
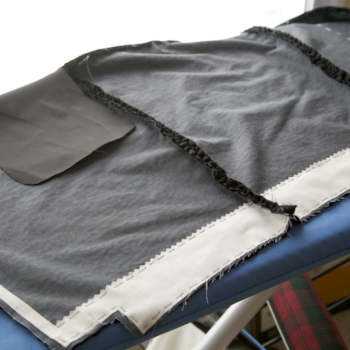
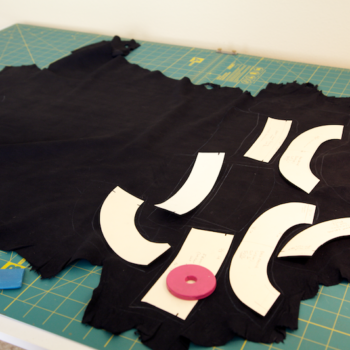
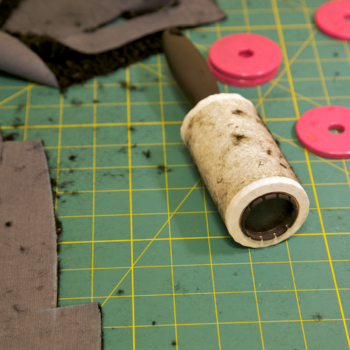
Oh my, is it March already? On my leap year day, I played a bit of hooky and spent a long day sewing, basting, hammering, sewing. The coat is so close and soon, I promise, I will be showing up in it in person!

What’s that, hammering? This might be a good time to introduce you to my friend, the mallet. I highly recommend whacking seams with a hard (preferably non-metal) object at some point in your sewing career–it’s therapeutic.

Whacking, smashing, the Jamie Oliver method of sewing. It’s also just about the only way to flatten intersecting leather seams.

In the end, the leather only occupied such a small fraction of the coat, but made for some very careful and slow sewing. I think I was stitching at snail speed on my machine. The most difficult part was inserting my leather trim neatly around the hip seam.

It’s basically one strip of leather that I pieced together and folded in half. Then I sandwiched it into the hip seam like one would sew piping. The result is a bit bulky especially around the inseam pocket. There was no way I was going to get that folded edge topstitched down neatly without first gluing or tacking it in some way to the fur. Yeah, I had to tape leather to fur. My other newfound friend: Wonder Tape.

For most of the leather seams, I used a teflon foot, which is the white foot you see below. My machine came with this and I’ve occasionally used it on other fabrics that seem to get pushed a lot by a regular foot. (A roller foot is an alternative.)

And there’s the jean-a-ma-jig tool in action. It’s sort of like a fork you stick under your foot. Understitching intersecting seams was much easier with this! (Another way of doing something like this is to slip a folded piece of cardboard under your foot about a half-inch away from the beginning of the bulky part, and sew “off” the cardboard.)

I understitched quite a bit, especially the seams that were going to be edges. On the leather seams that needed to be pressed open, I used double sided fuse tape to permanently hold them down. (Some like to use glue or edge-stitch the SAs down.) These seam allowances are fused-taped and then trimmed near the edges, where there will be an intersecting seam:

On the needle front, I used both leather and microtex needles in size 9, which I had from a previous project. (I found both of these in 20-packs on ebay awhile back.) Both are very sharp and seemed to work well on the lambskin and the fur. Little binder clips are also good to have around, to hold seams together in lieu of pins! I confess I abandoned these because they just kept getting in my way. There were places where I couldn’t baste or pin and I had to hold the layers tight and just pray the fabric didn’t move around too much.

Now back to whacking… just one more hammering session and I’ll be happy enough to sew the lining shut.

· Comments { 8 }

Shopping, To Cure What Ails Ya…

For some reason I’m weirdly thrifty about thread. There are gadgets and patterns and buttons overflowing my drawers but when it comes to thread I always buy exactly the color I need and usually just one spool of it. Why I thought a half-spool was going to last me through my coat, who knows. And since driving twenty minutes to the store just for black thread in my semi-feverish state seemed so pointless, I figured I might as well poke around for a few toys.

This is how I end up with all kinds of odd sewing tools. Go for last-minute thread, walk out with gadgets. Every time I walk through Joann’s, past the fake flowers and reams of paper-craft aisles, I discover some new sticky tape or loop-turner that needs trying. This time it was the jean-a-ma-jig:

Have you tried this? I love it! You can see here how I already used it to sew over bulky seams on my leather. I’ll write more about that later…

And then, ooh, there was this cone-spool holder:

I’m sure I could’ve gotten this cheaper on Amazon but ah well. I have a couple of industrial-size spools of white thread (my one thread backstock) I bought last year that don’t fit on my machine. I’m not sure what I was thinking when I got them, but this kind of spool holder might inspire me to buy bigger cones of the basic colors I’ll always need.

And then of course there were patterns. It just so happened that they were having a sale on Vogues so I bought two. It’s been awhile since I’ve bought new Vogue designer patterns. Way back in the day before ebay and etsy, I used to stalk the pattern sales with my mom. And when the designer ones went on sale for $3.99, it was a pretty sweet deal. It still is.

I don’t wear many fitted dresses, but you never know. Plus I just wanted something to look at while laying in bed. Actually, I’d go for the draped top in the Donna Karan pattern… very Helmut Lang-ish and right up my alley. The Tracey Reese pattern has 21 pieces! And would need a serious muslin to get a proper fit with all the straps and bust shape, but can you imagine a 21-piece muslin?!

And last but not least, Amy’s enthusiasm for Craftsy courses inspired me to sign up for Susan Khalje’s Couture Dress course. I’ve been really curious about the class format, probably more than the dress. The whole presentation is so elegant–great videos, really nice graphic interface, well organized. A nice way to spend a sick day, browsing through videos!

I don’t find myself gravitating to the couture process much but I like picking up ideas from all kinds of processes. And I like her teaching personality–she’s very jolly and easy to follow. So if you are interested in couture-ing, paying $39 (thanks to Marina’s sweet offer!) for like eight hours of video instruction can’t be beat. If you’re interested in this particular course, Susan recommends several other patterns if you don’t like the course’s free pattern. The wide square neckline is my least favorite, so I’ve been hunting through my Burdas for a suitable alternative.

And thanks for the well wishes! I’m feeling much better today… (although I had to go back and make sure I didn’t post anything strange last night out of delirium.)

· Comments { 11 }

Cocoon Coat: Sewing the Fur!

This was the week to get my coat done. I had lots of extra time for sewing and then a little-turned-big winter cold decided to take over. People, it was 90 degrees here yesterday. Having a fever in this kind of weather in February is so disorienting. But with a little seam here, a seam there the coat is slowly but surely coming together. The lining is done and the rest of the coat getting close.

Each new material brings a different challenge and learning how to “feel” it as it sews. Last year I worked so much with silk and similarly drape-like rayon that I abandoned pins altogether. I got used to the feel of it in my hands, under the machine, how it feeds, how to control ease and sew around curves. Gaining this kind of tactile knowledge, of both machine and material, is a real pleasure. I love letting fabric intuitively do what it wants to do.

I don’t have much experience quilting but it must be like this experience of this persian lamb fabric. It’s so lofty and cushy and the layers slide around on each other. Just sewing two layers about five inches long results in the top layer creeping a half inch longer. I pulled out my machine’s walking foot but there was still a lot of creepage. In the end I basted all the fur seams before sewing and still used the walking foot for control.

Back when I was sewing clothes in college I’d use like 50 pins just to put in a sleeve and elsewhere did a lot of basting–and still get mightily frustrated when things didn’t line up. Maybe sometimes the pattern was at fault (I wouldn’t have known anything about walking patterns or even thought that patterns could have problems). But I didn’t know much about material handling either, like how to use the feed dogs to ease bottom layers. It was more like trust the pins over trusting or getting to know the fabric.

One interesting tip I picked up from Fehr Trade was to sew fur seams down the nap. Which means sewing all seams from top to bottom. So when sewing the sleeves, rather than going around the entire circle in one pass, or going from the underarm up as some often do in setting sleeves, I sewed each side from the top down.

I wasn’t quite sure how to go about the bust darts. They seemed a little bulky after sewing them shut, so I tried clipping one of them open. This made a bit of a fur mess so I slipstitched the dart together and then tacked it down to the fabric. I left the other one unclipped since it didn’t seem to make much difference from the outside.

For some reinforcement, I used a bit of fusible tape around the armholes and areas where the pockets and zippers would be. I practiced on scrap to make sure it wouldn’t crush the pile.

For larger areas like the hem and front facing I basted in some woven interfacing.

i’ve got a few more pictures of the leather sewing but I’ll save that for later. Now back to my queue of b-list netflix movies and shlepping around in the bathrobe…

· Comments { 8 }

A Bit about Leather Cutting & Fusing

When the forsythia blooms, you know spring is coming. (And an old wise gardener taught me that’s when to prune roses in the south.)

I love these vines. They look very bramble-y climbing all over trees the rest of the year, but are the pride of the south in February. Such a glowing yellow yellow yellow. So I had to break up these posts in black with some color, right? Because I know we are all dreaming of our spring palettes now.

As promised, I wanted to share some tidbits about leather cutting and fusing. There’s a nifty post here about the layout of a hide and how to determine nap–which is kind of like learning the grainline on fabric. You’ll also see which parts are stronger and weaker.

I tried to lay all my facing pieces with the grain going the same direction and still get the most out of the “good” leather. Whatever was left would be cut into strips to piece together for trim. Once I got the general layout of the facings, I loosely traced around the section they’d be cut from so I could block fuse the entire area. My leather is thin and almost as stretchy as stretch denim, so the facings definitely needed some reinforcement.

In case you’re wondering, it’s possible to fuse to leather! I cut off one of the, erm, legs which wouldn’t have been usable to test out my interfacing.

So far, here’s what I’ve learned about fusing leather:

  • If possible use an interfacing that doesn’t require gobs of steam to adhere or melt the glue. It seems like leather can take a lot of heat–I tried everything from the coolest to the wool setting–but lots of steam could possibly damage or dry out the leather (ask how I know!). In my test above, I didn’t use any steam at all, just a dry iron, and it fused perfectly! The ticket is a cool-fuse interfacing (this is the stuff I used), and if your interfacing requires some steam, try using a damp press cloth or misting a small amount from a water bottle.
  • Use a press cloth or teflon shoe. Just in case. I never knew about using press cloths until a couple of years ago, but they really helped in preventing those “shiny” marks on fabrics, which are basically scorch marks. I mostly just use the shoe now, which I think I found for under $20. (It was definitely a good investment as I haven’t scorched fabric since… these are nothing like the coating on the bottom of most irons.) Leather can be ironed. Seriously. This stuff is tough!

After block-fusing the whole facing-pieces area, I traced and cut. It helps to have a pattern stiffer than tissue paper in order to trace off the pieces. I like doing this on most of my patterns but it’s pretty much a necessity with leather since pinning tissue is out of the question. (Alternatively, you could weigh down a pattern and use a rotary cutter.)

The last thing I did was cut out all the strips that I’m piecing together for the trims from the remaining leather. I just used a ruler and rotary cutter for these:

That’s all for today… off to prune and tie up roses with my dear Valentine. That’s kinda romantic, right? (Except for all the thorn cuts!)

· Comments { 6 }